





GitHub is not just a place to store your code – it’s an essential resource for project management, team collaboration, and GitHub issue tracking. Whether you’re working alone or you are a member of a large team, GitHub Issues provides a space to manage all aspects of your project. You can not only share insights, and make decisions, but also make sure that everyone in the development team is on the same page about the project.
Using GitHub Issues effectively, modern QA teams can maintain clarity, reduce miscommunication, and deliver high-quality software faster.
Some organizations may additionally use Jira or any other issue-tracking tool for comprehensive project tracking.
What Is a GitHub Issue? A Guide to Issue Tracking
So, what is a GitHub issue? GitHub issues are used to define tasks, from individual developers to large teams, to guarantee that team members are aligned and working towards common goals. They not only let team members keep track of their work on a GitHub repository, but also allow them to report bugs, request improvements, or discuss implementation details of some parts of the code. In other words, issues are structured to-do lists for development tasks that make GitHub issue tracking simple and help teams track progress and prioritize their workload. To sum up, every GitHub issue:
- Has a creator and should have one or more assignees to execute the task.
- Should be manageable and shouldn’t stay open for too long.
- Changes as the project progresses and new information becomes available.
- Can be organized so that the most important tasks are addressed first.
GitHub Issue Management: Key Features
GitHub issue management relies on a set of built-in features that keep work organized:
- Issue Creation. It is used to create issues assigned to team members who are responsible for addressing them.
- Labels and Milestones. They are used to categorize issues based on various criteria, such as priority, type, or component, while milestones are used to set deadlines for specific groups of issues.
- Assignees and Notifications. These features allow assigning issues to specific team members and customizing notification settings to receive alerts for specific events, such as when an issue is created, updated, or assigned to you.
- Comments and Mentions. They are used to help teams stay on the same page through threaded comments and @mentions to share information and updates.
- Markdown Support. This feature helps improve issue descriptions and comments with markdown formatting for better readability and structure.
- Project Boards. This feature is used to make it easy to see which tasks are done, which are in progress, and which still need to be done.
- Issue Templates. They allow team members to save time and effort by using pre-defined templates for issue reporting.
- Cross-Repository Issues. They connect issues across different projects to gain a whole view of related tasks and dependencies.
Also, we would like to mention some advanced features:
- Issue Dependencies. By using GitHub Projects or third-party integrations, you can set up issue dependencies, where one issue is blocked by another. With this feature, you can visualize the sequence of tasks (hierarchies of issues) and guarantee that work progresses in the correct order.
- Custom Search and Filters. GitHub’s powerful search syntax allows you to create custom filters to find issues based on specific criteria, such as labels, assignees, milestones, or keywords in the title and description, to stay organized and focused on relevant tasks.
- Task Lists. Break a large issue into checkable sub-tasks, and GitHub tracks how many are complete — a simple way to visualize progress on bigger pieces of work.
GitHub Issue Types You’ll Track
Most teams manage a handful of github issue types, and separating them keeps your github issue management tidy:
- Bug report. Something is broken — includes steps to reproduce, expected versus actual behavior, and screenshots.
- Feature request. A proposed improvement or new capability.
- Task / chore. Planned work such as refactors, documentation, or maintenance.
- Question / discussion. An open point that needs a decision before work starts.
Labels make these github issue types easy to filter, and each one can have its own issue template — more on that below.
GitHub Issue Templates: How They Work
GitHub issue templates are pre-defined forms that open when someone creates a new issue. Instead of a blank box, contributors get a structured layout with the sections your team actually needs — steps to reproduce, expected versus actual behavior, environment, and priority. GitHub issue templates keep every report consistent, so nothing important is missed and triage moves faster. A single repository can hold several github issue templates — a bug report, a feature request, and a task — and GitHub shows a chooser so the author picks the right one.
How to Create a GitHub Issue Template
- In your repository, open Settings.
- In the Features section, find Issues and click Set up templates.
- Choose a template type (bug report, feature request) or start a custom one.
- Add a name, description, default title, and the body sections your team needs, using Markdown for structure.
- Click Propose changes and commit the template to your repository.
Once saved, every new issue offers your templates in a chooser, so contributors always start from the right structure.
GitHub Issue Template Best Practices
A few github issue template best practices keep your forms useful: keep each template focused on one issue type; ask only for what triage needs — repro steps, expected/actual, priority — so short forms actually get filled in; use clear Markdown headings and checklists; set default labels and assignees so issues are routed from the start; add a title prefix like [Bug] for scannable lists; and review your templates as the project evolves.
GitHub Issue Tracker Integrations (Slack & Jira)
By connecting GitHub Issues with the tools your team already uses, you can streamline your workflow and keep task management in sync across systems. GitHub works well as an issue tracker alongside platforms like Slack and Jira, so updates reach every team member wherever they work.
Integrating GitHub Issues with Slack, Jira and Your GitHub Test Case Management Tool
- Slack. You can connect GitHub Issues with Slack so that teams get real-time notifications in their Slack channels whenever an issue is created, updated, or closed. This integration helps make sure that all team members are informed about important developments without having to leave their communication platform.
- Jira. When applying the Jira tool for project management, you can integrate GitHub Issues to bridge the gap between code development and project tracking. You can sync issues between GitHub and Jira to manage tasks in Jira while keeping developers informed in GitHub.
- GitHub Projects. Link issues to a project board to see status across repositories at a glance, so nothing slips between teams.
By connecting GitHub Issues with the tools your team already relies on, you create a more efficient and cohesive workflow. These improvements not only save time but also help make sure your projects are delivered on schedule.
How to Create an Issue: A Step-By-Step Guide
Let’s review the steps involved in creating an issue on GitHub:
- Navigate to the Repository. At this step, you should go to the repository where you want to create an issue on your GitHub dashboard. Also, you can search for it using the search bar. If you’re working on a specific project, you can quickly find the corresponding repository in your project list.
- Go to the Issues Tab. By clicking on the “Issues” tab at the top of the repository page, you’ll access a list of all open and closed issues related to that specific repository. This tab offers access to managing and tracking tasks, bugs, and feature requests within the project.
- Click New Issue. At this step, you need to click the “New issue” button to initiate the process of creating a new task, bug, or feature request within the repository. This action will open a form — or your issue template chooser — where you can provide detailed information about the issue.
- Fill Out the Issue Form. Here, you need to provide a clear and concise title and detailed description. You can also assign labels and assignees at this stage.
- Submit the Issue. By clicking the “Submit new issue” button, you can finalize the creation of the issue and add it to the repository’s issue list. This will make the issue visible to other team members and allow them to view, comment on, and contribute to its resolution.
Benefits of GitHub Issue Tracking for Teams
- Team members can easily see the status of each task to make sure that everyone is on the same page.
- Teams can better collaborate thanks to the comments and discussions attached to issues.
- Teams can better manage all tasks, from small fixes to major features, as they are organized and tracked in one place.
- Teams can report bugs with detailed information, including steps to reproduce, error messages, and screenshots, so that developers can quickly understand and resolve the issue.
- Teams can categorize and prioritize issues based on severity and impact to tackle critical bugs promptly.
- Teams can link bugs to specific code changes, making it easier to identify and fix root causes.
- Teams can gather feedback and insights from users who interact with the product daily.
GitHub Issues: Tips and Best Practices
Below you can find some essential tips for the teams. When following them, they can speed up their workflows, improve collaboration, and develop more high-quality software:
#1: Issue should be descriptive
When creating a new issue, you need to provide a clear and concise title. It should accurately describe the problem. Also, don’t forget to include any relevant information to better explain the background of the issue. By using clear and specific language, you can eliminate confusion and communicate any error messages, screenshots, or code snippets to help others understand and resolve the issue.
#2: Utilize Labels
With labels, you can organize and manage GitHub issues effectively. You need to think of creating a consistent labeling system and use descriptive labels to categorize issues. Furthermore, you can not only apply multiple labels to provide more context but also use labels to filter and search for specific tasks. As a result, you can improve visibility, facilitate collaboration, and streamline your github issue management process.
#3: Assign Responsibilities
You need to assign issues to specific team members to guarantee accountability and efficient task management. Only by taking into account their workload and expertise can you encourage collaboration and assign tasks to teams or groups. Also, remember to regularly review progress and provide feedback to make sure that tasks are completed.
#4: Set Milestones
With milestones, you can track progress and better organize your work on GitHub. When creating relevant milestones, you need to align them with your project’s goals and timeline. Also, you need to link issues to milestones to track their progress, set deadlines, and regularly review your work to identify any problems. By using milestones effectively, you can improve project visibility, enhance accountability, facilitate better decision-making, and boost team productivity.
#5: Regularly Update
To maintain a clear and up-to-date picture of your project’s progress, you need to regularly update issues. Only by keeping issues updated can you improve communication, prevent misunderstandings, and detect potential problems. This will contribute to a more efficient and effective workflow in the long run.
#6: Link Issues and Pull Requests
When linking issues and pull requests on GitHub, you can establish a clear connection between tasks and corresponding code changes. This can help you track progress, streamline collaboration, and simplify the management of large projects. By effectively linking issues and pull requests, you can improve the efficiency and transparency of your development process.
Testomat.io: The Best GitHub Test Management Tool and Issue Tracker
testomat.io is a powerful issue and defect tracking solution that connects directly to GitHub Issues, making it one of the best GitHub issue tracker software options for QA teams. Thanks to two-way syncing between testomat.io and GitHub, changes in issue priorities, statuses, or labels reflect in both platforms instantly.
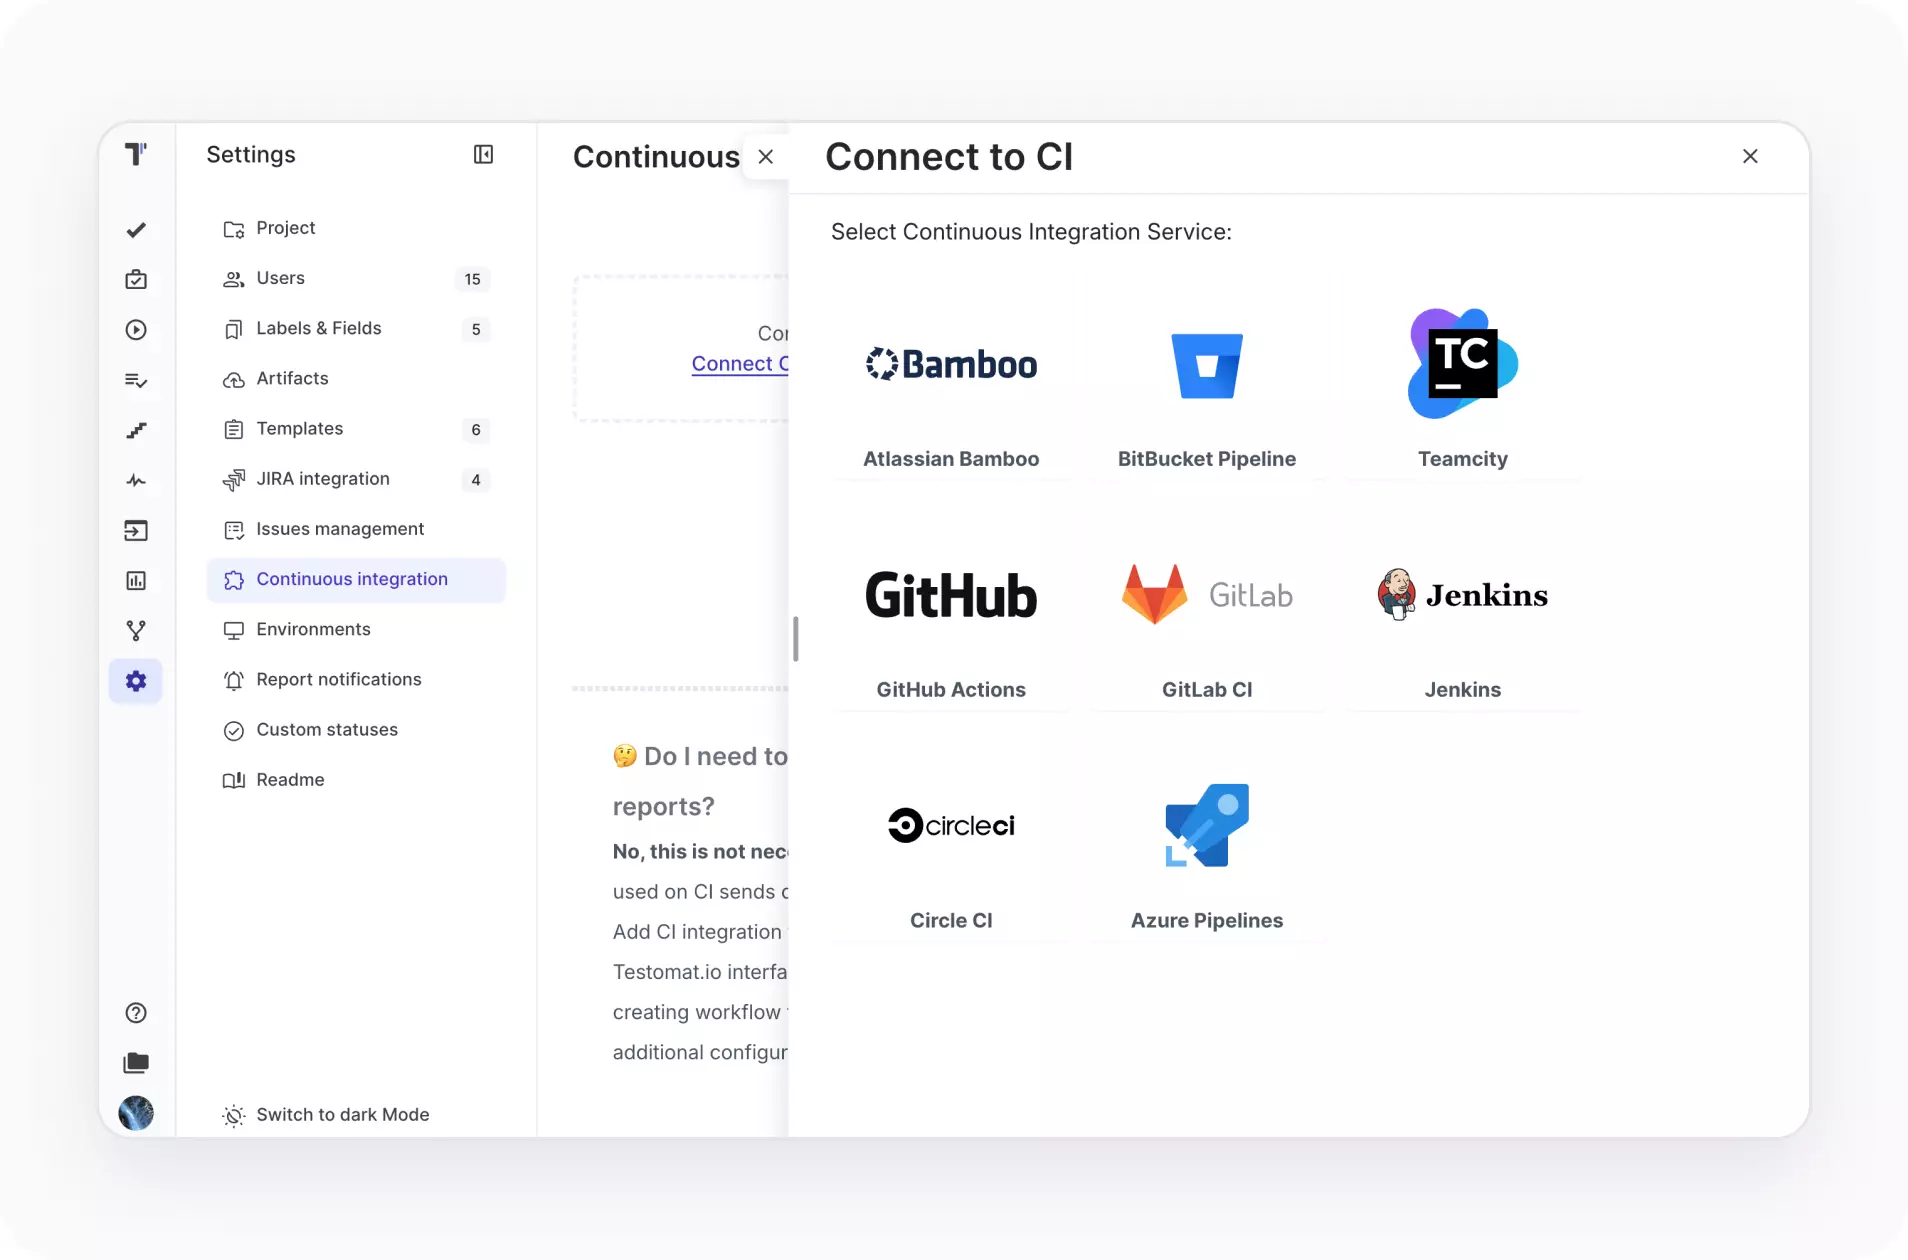 GitHub Issue Tracking Integration
How to Connect Testomat.io as Your GitHub Test Management Tool
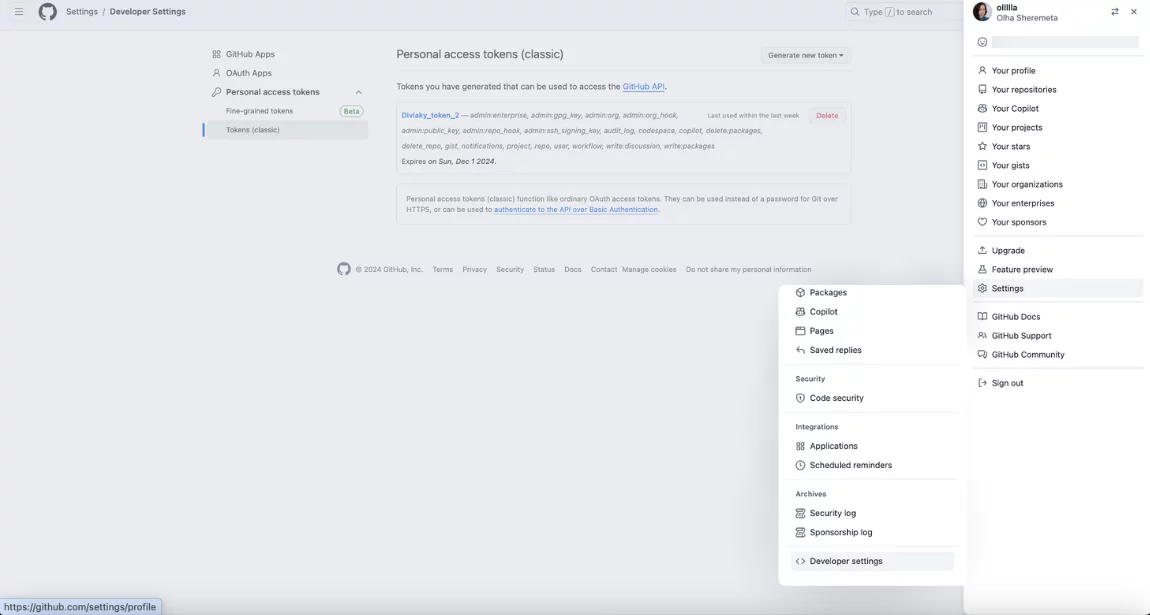
So, as you can see 👀 to install a connection between both platforms and manage GitHub issues, you need to fill in a GitHub API Token. To find it, go to your GitHub user’s Account settings, then Developer Settings and Tokens. Select scopes, check repo (for full access to public/private repositories, including issues) and everything else you need. Generate your personal access token at the bottom. Copy the GitHub token immediately, as it will not be shown again. Your token is now ready for use in managing GitHub issues with Testomat.io.
Link GitHub Issues to Test Cases
From now on you can directly push and link related issues identified during testing to GitHub. For existing issues, paste the URL query of a specific issue.
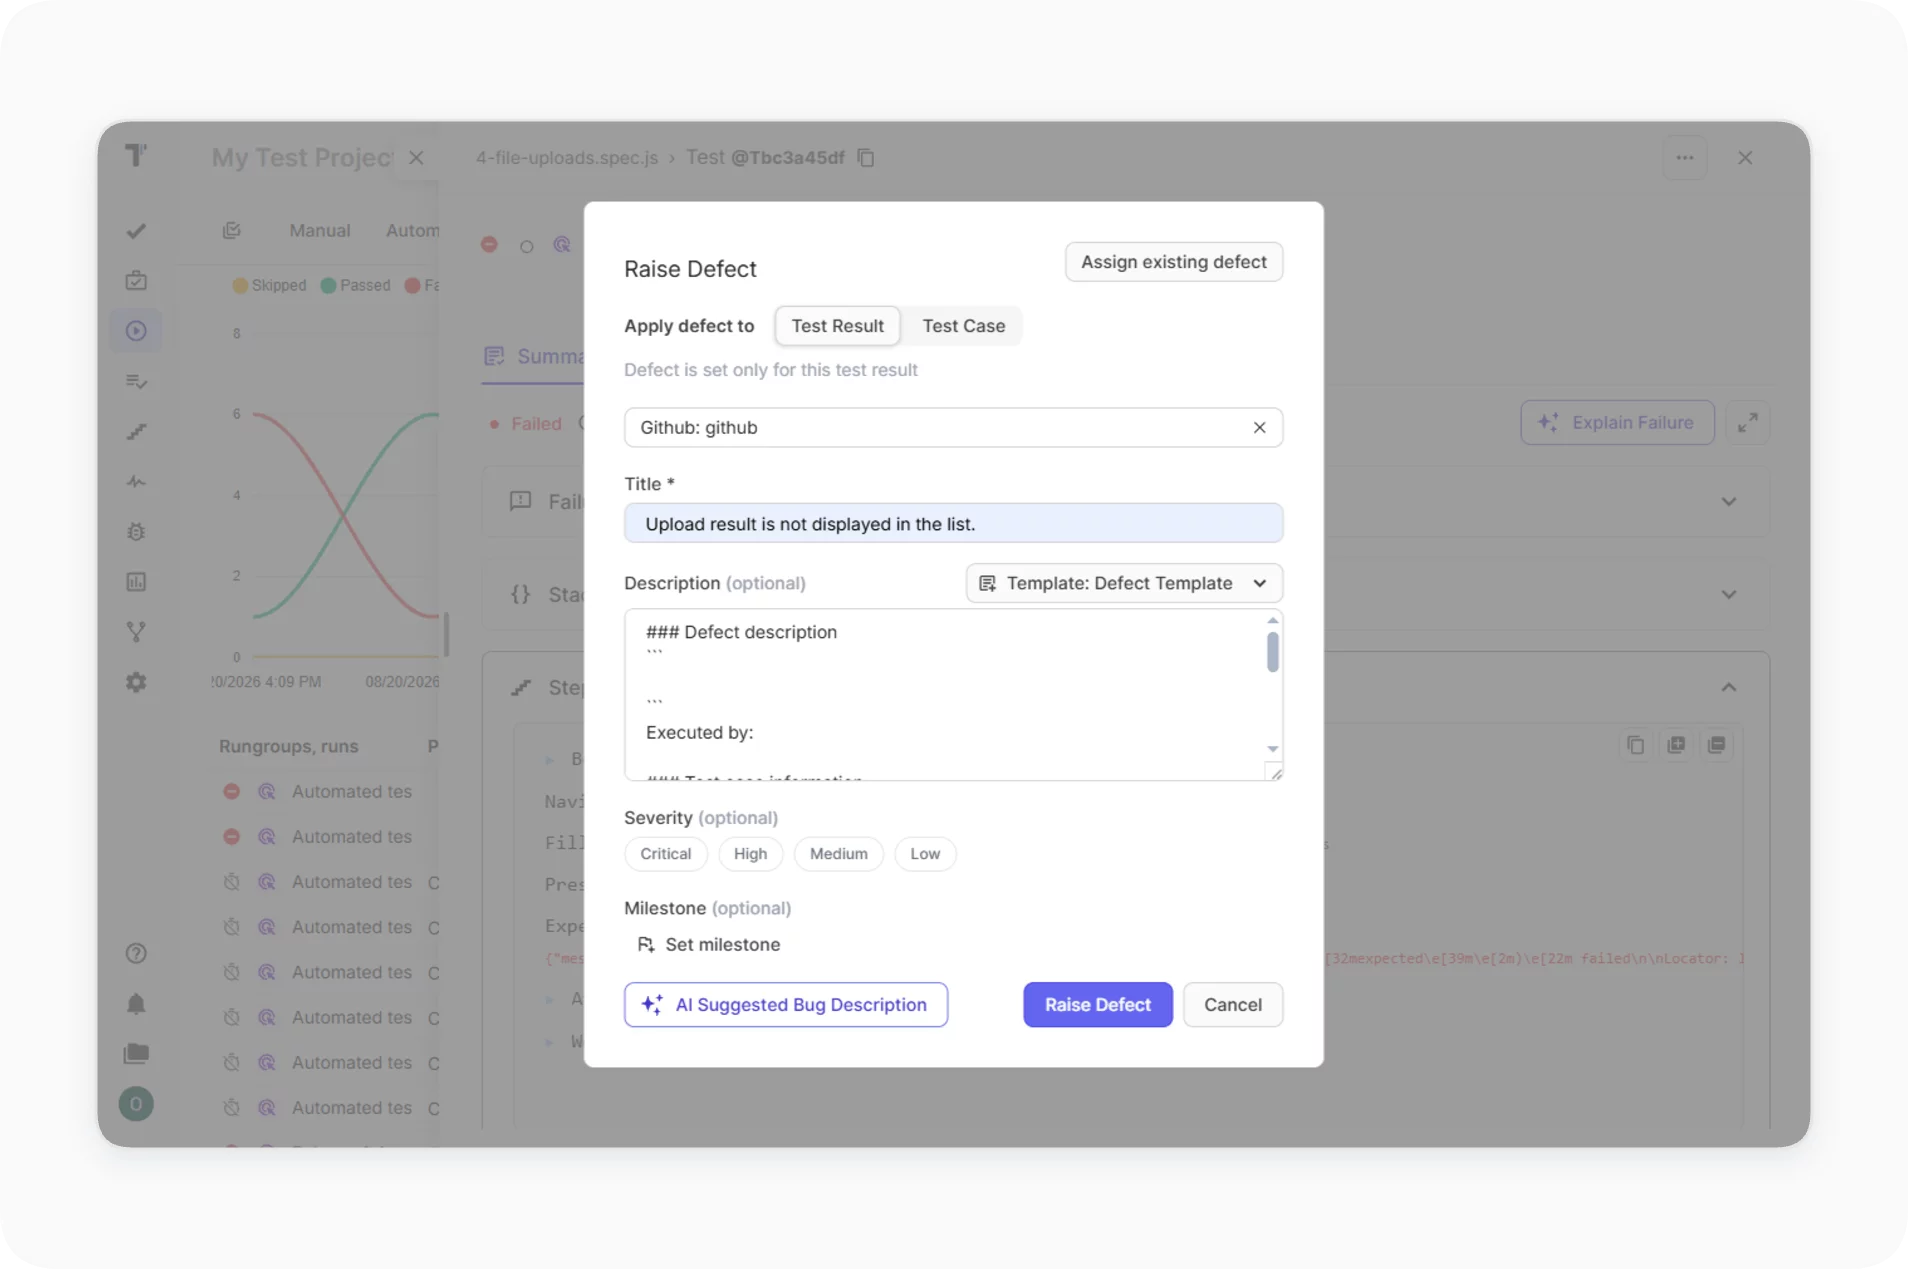
Create and Link Defects from Failed Tests
In the same way, you can quickly create and link defects for any failed tests. New issues are linked back to their source after creation, enabling a direct GitHub issue status lookup inside Testomat.io.
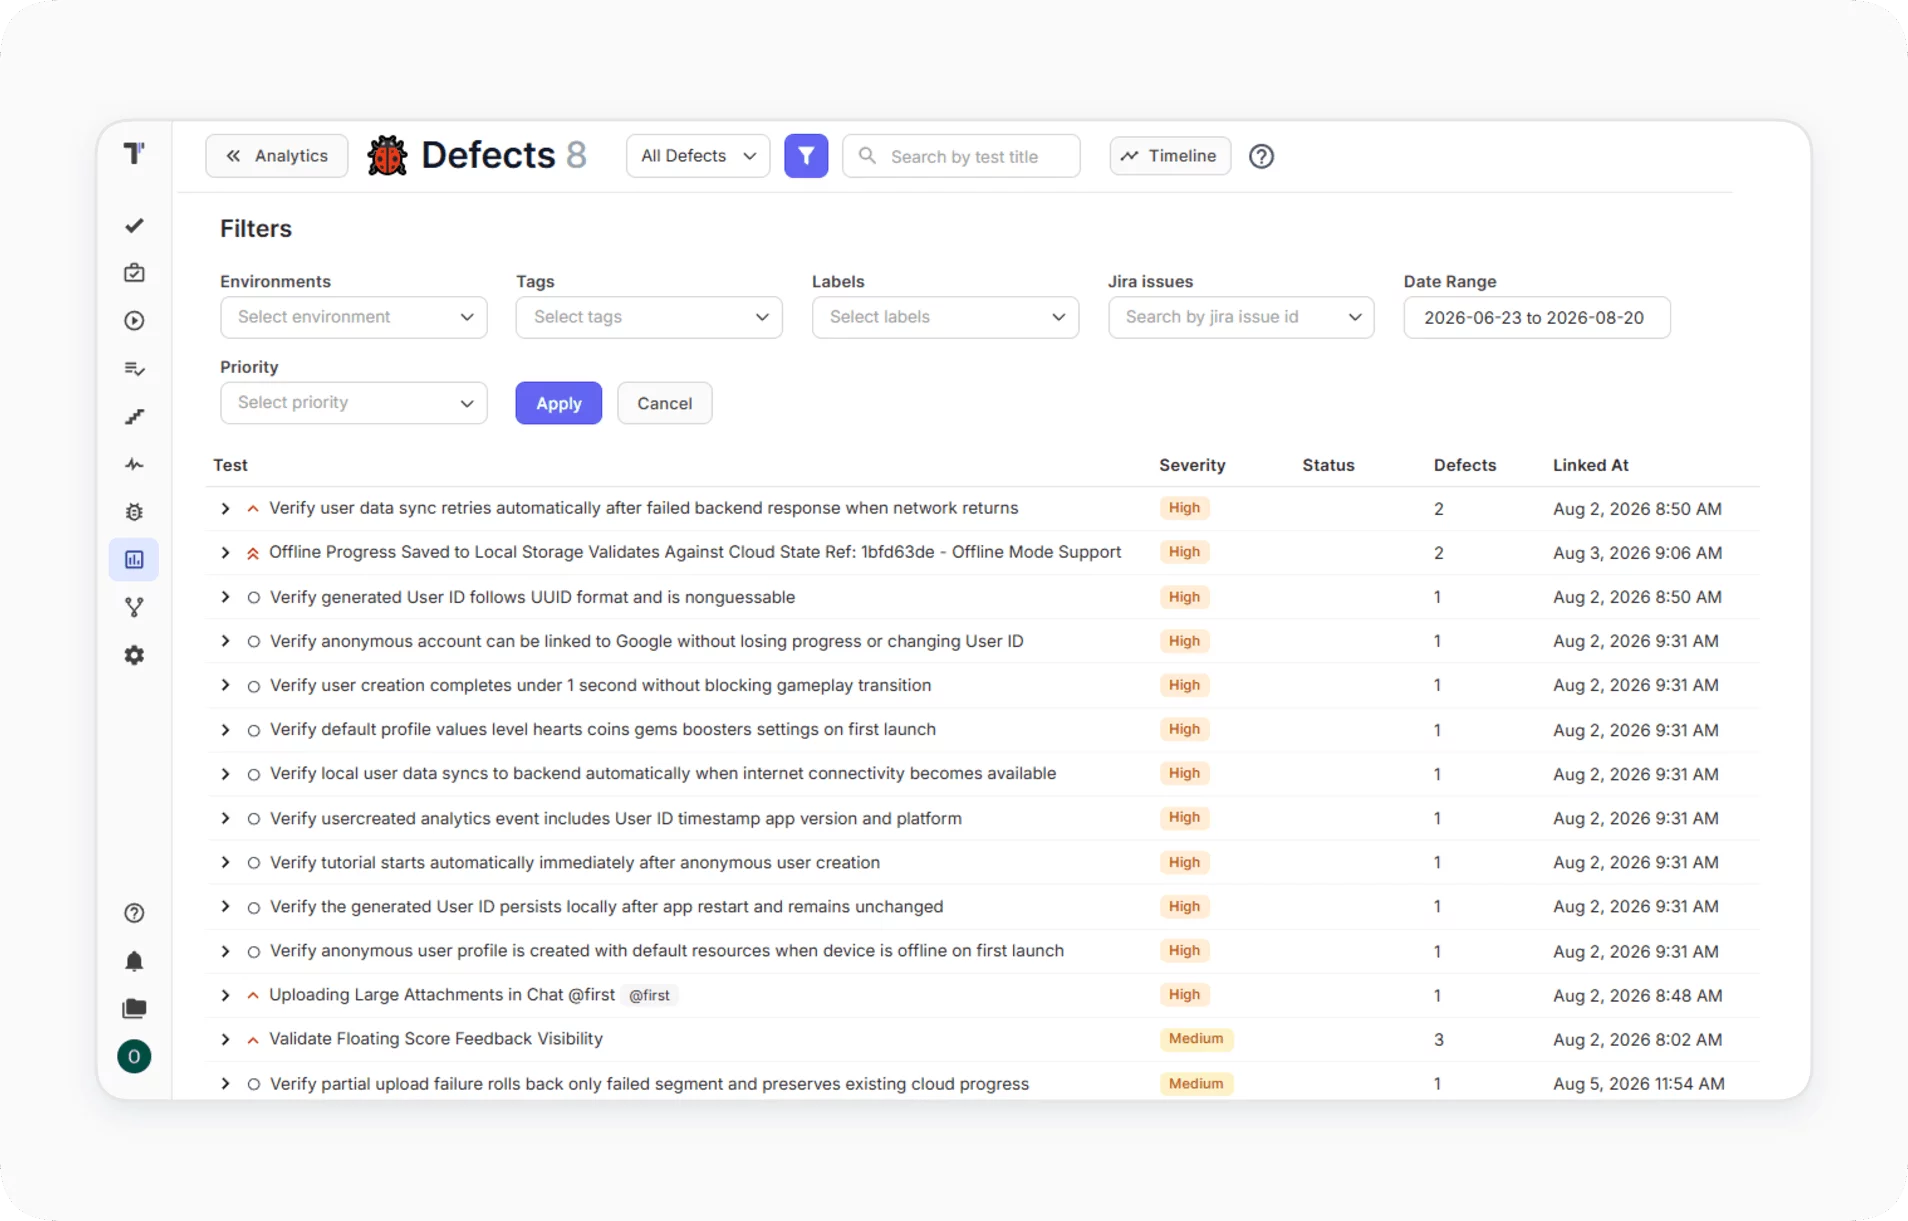
Track Defects with GitHub Test Case Management Analytics
You can create a GitHub issue from a failed test in a run report or during a manual run. Testomat.io attaches the steps, environment, screenshots and logs to the issue. The Defects board in Analytics shows which tests each defect blocks, with the defect’s severity and status. You can filter results by tags, labels, priority, environment or date range. You can also use custom fields to add your own data to test cases.
Why Testomat.io Is the Best GitHub Test Case Management Tool
- Intuitive and Easy to Use. Our UI is built to be simple, reducing the learning curve in an organization and managing complex workflows for non-technical members.
- Complete Defect Management. Our platform offers a consolidated view of every issue encountered during testing, linked on the fly without complex setup.
- Unified Tracking. Organize tasks, exploratory sessions, and defects in one place, with custom fields and tags, and link your work to multiple GitHub repositories to fit your team’s unique requirements.
- Comprehensive Quality Metrics. Built-in dashboards and metrics let teams track everything from coverage to defect trends, giving insight into overall project health.
- Enhanced Synchronization and Collaboration. Whether syncing issues, tracking defects, or reviewing results, Testomat.io keeps all your tools and teams on the same page.
Looking for a Free Test Case Management Tool for Jira and GitHub?
With direct connections to GitHub Issues, our solution turns GitHub into a comprehensive issue-tracking environment, helping teams keep pace with the rapid demands of modern software development.
Bottom Line: Open Source Test Case Management Tool on GitHub or a Full GitHub Test Management Tool?
Being a powerful tool, GitHub Issues provides a comprehensive solution for managing software projects. Within an issue, you can use task lists to break larger pieces of work into smaller tasks. Only by understanding and utilizing its key features — such as labels, milestones, and assignees — can teams keep their work organized and aligned with their goals while collaborating and communicating better. Whether you’re working on a small open-source project or managing a large enterprise app, using GitHub Issues helps you improve your team’s productivity and the quality of the software you deliver. Do not hesitate to drop us a line contact@testomat.io if you have any questions about utilizing GitHub Issues.