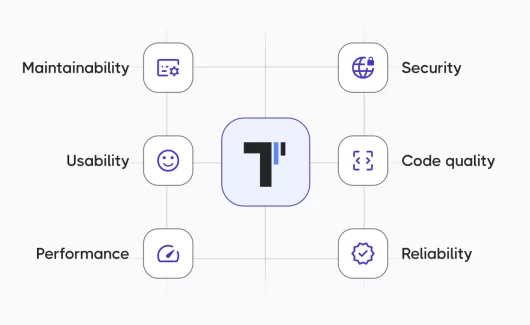


When choosing automation tools, teams are guided by the following: flexibility, speed of test writing and how is easy reading their code. We realize how important this is for Agile projects and strive to give you access to the most effective frameworks. One of them is CodeceptJS. The main points of working with the framework in Agile projects we will consider in this CodeceptJS concepts tutorial.
What Is CodeceptJS?
CodeceptJS is an efficient modern End-2-End testing framework that allows you to describe high-level DSL tests. It has a special BDD style syntax, i.e., based on behavior.
CodeceptJS framework provides syntax utilizing proven, well-known libraries such as WebDriverIO, Playwright, Protractor, Appium, and others. Due to the simplicity of writing and reading code, it is a good option for teams looking to improve the speed of their automated tests (AT).

The main points of working with the framework in Agile projects we will consider in this CodeceptJS concepts tutorial.
Automation Testing With CodeceptJS
CodeceptJS allows you to write acceptance and functional tests as a linear usage scenario. Notably, test execution is delegated to helpers. The peculiarities of the test automation process are determined by which helper is used.
💡The choice of assistant depends on the goals of the QA team:
- Web testing – the framework works with Playwright, Puppeteer, Nightmare, TestCafe, etc. They use the same API, which makes it easy to transfer tests between servers.
- Mobile testing – when it comes to testing a mobile app, it is worth choosing Appium or Detox layers. The former is suitable for native and hybrid products, the latter for React Native-based solutions.
- API – to check the correctness of requests and their responses, the team can use helpers such as REST, GraphQL, MockRequest, JSONResponse, and ApiDataFactory.
For example, the testing framework allows you to test mobile and hybrid solutions similarly to testing web applications. In any case, if the project requirements have changed, you can quickly and easily switch to another tool.
Tests are created from the user’s point of view. Each step is designated as method “I.” Tests are described inside the Scenario function. The following is a simple example for a good understanding of the essence.
Feature('CodeceptJS Demo');

Scenario('check Welcome page on site', ({I}) => {
  I.amOnPage('/');
  I.see('Welcome');
});
All of this makes writing tests and reading them easy. The speed and flexibility of test automation increase, which is important for Agile-oriented teams.
How to start with CodeceptJS?
You can use CodeceptJS all-in-one installer to get a demo CodeceptJS and Playwright project.
npx create-codeceptjs .After CodeceptJS is installed, try running demo tests using these commands:
npm run codeceptjs:demo // executes demo tests in window mode
npm run codeceptjs:demo:headless // executes demo tests in headless mode
npm run codeceptjs:demo:ui // open CodeceptJS UI to list and run demo tests.
Start a new project by initialising the main file codecept.conf.js
npx codeceptjs initWhy Do Many QA Teams Choose CodeceptJS?
Thus, there are many reasons why modern teams tend to use this testing framework in their daily work. As we noted above, this applies to testing web solutions as well as mobile and hybrid projects, regardless of the level of complexity.
Benefits of test automation with CodeceptJS:
- Multiple testing tools in one framework. This is a wrap-around of well-known tools. By choosing one of the above options, you can use a similar script for each.
- Ease of use. Running tests takes about 5 minutes and is available to specialists with no experience in automation testing. It also cuts down on configuration resources, which is important for small projects.
- Synchrony in test writing. There is no need for callbacks or promises. This approach ensures the readability of the tests and simplifies their further maintenance.
- Extensibility thanks to helpers. Add-on libraries allow you to introduce a low-level API into your tests and share functions across projects.
Here we have highlighted only a few striking advantages. In fact, there are more: interactive debugging, multisession testing (in several browser windows), working with CI of all types, and so on. Considering the framework’s value, we would like to suggest you an integration with test management testomat.io as better native reporting and analytics for your CodeceptJS tests.
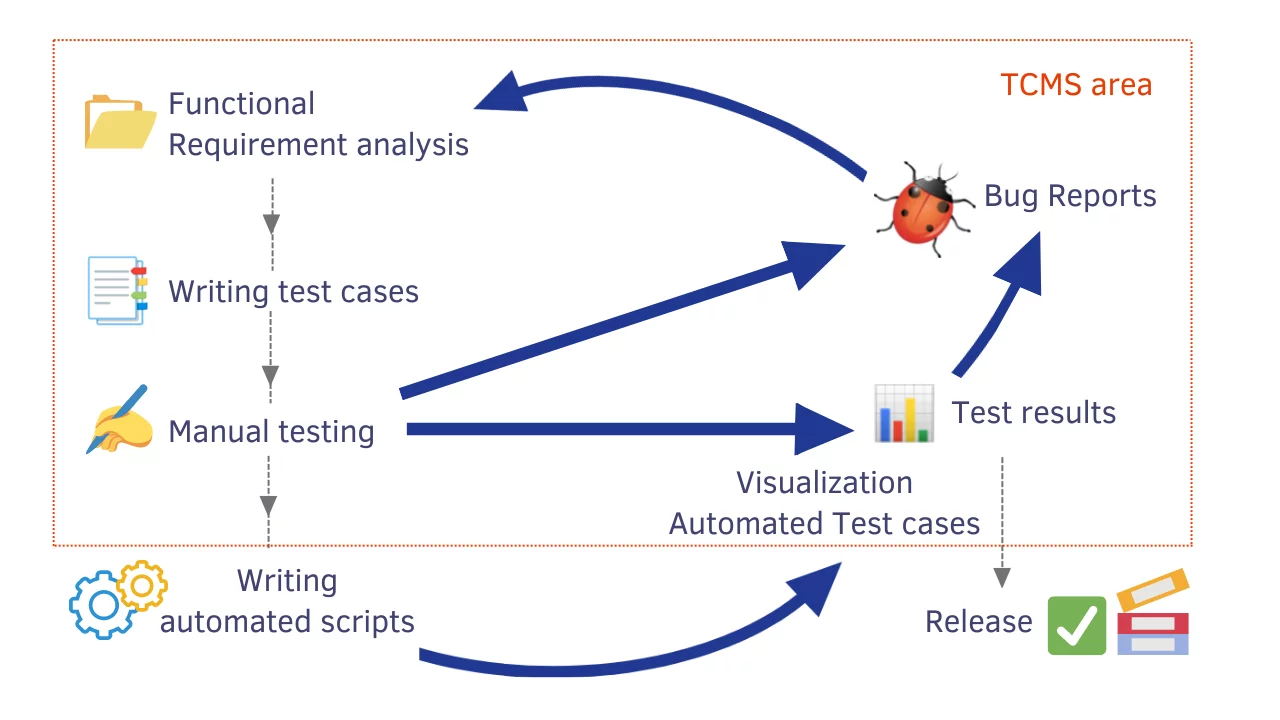
Sync CodeceptJS Tests With Manual Testing
We strive to provide the clearest and most convenient testing experience for all team members. That’s why we gave TMS users the option to integrate with CodeceptJS, along with other top testing frameworks: Cypress.io, Playwright, Webdriber.io, Cucumber, Mocha, Jasmine, etc.
In addition to JavaScript, on which the framework is based, the system also supports TypeScript and PHP, Java, Ruby, CSharp programming languages through JUnit XML report.
The Build-In Importer is provided for integrations. The import process is performed in a few clicks and does not require a long setup.
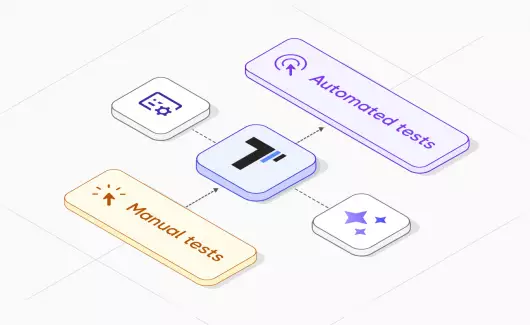
Automated and manual tests are managed in a single environment to ensure consistency and transparency of CodeceptJS tests.
👀 Would you like to see it for yourself?
Next, we will tell you how your team can get started with TCMS.
Getting Started CodeceptJS From Example
The test management system allows you to write and run tests, even involving non-technical people. Take the following steps and give your team a good start.

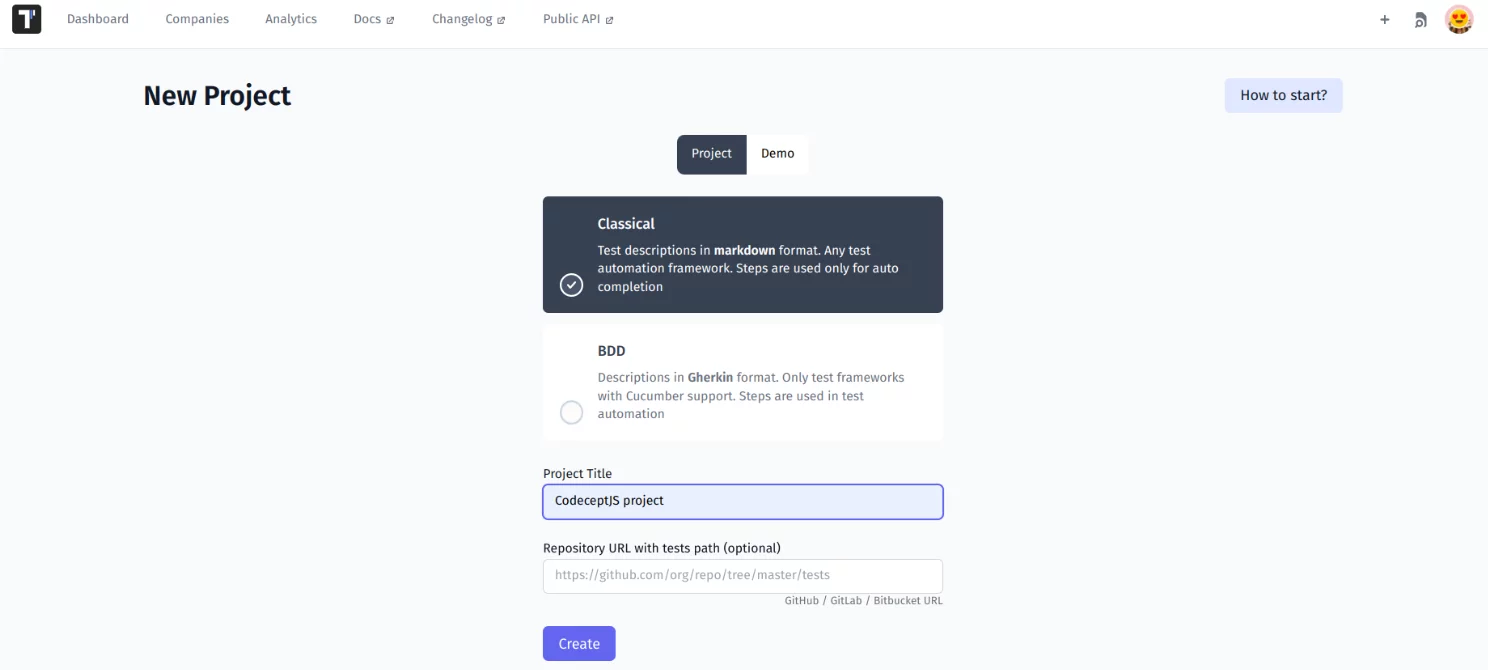
#1 Create a new project
This is the first step to start your work in the TMS. It’s simple: just select the type: classic or BDD test project, add the project title and finally click Create button.
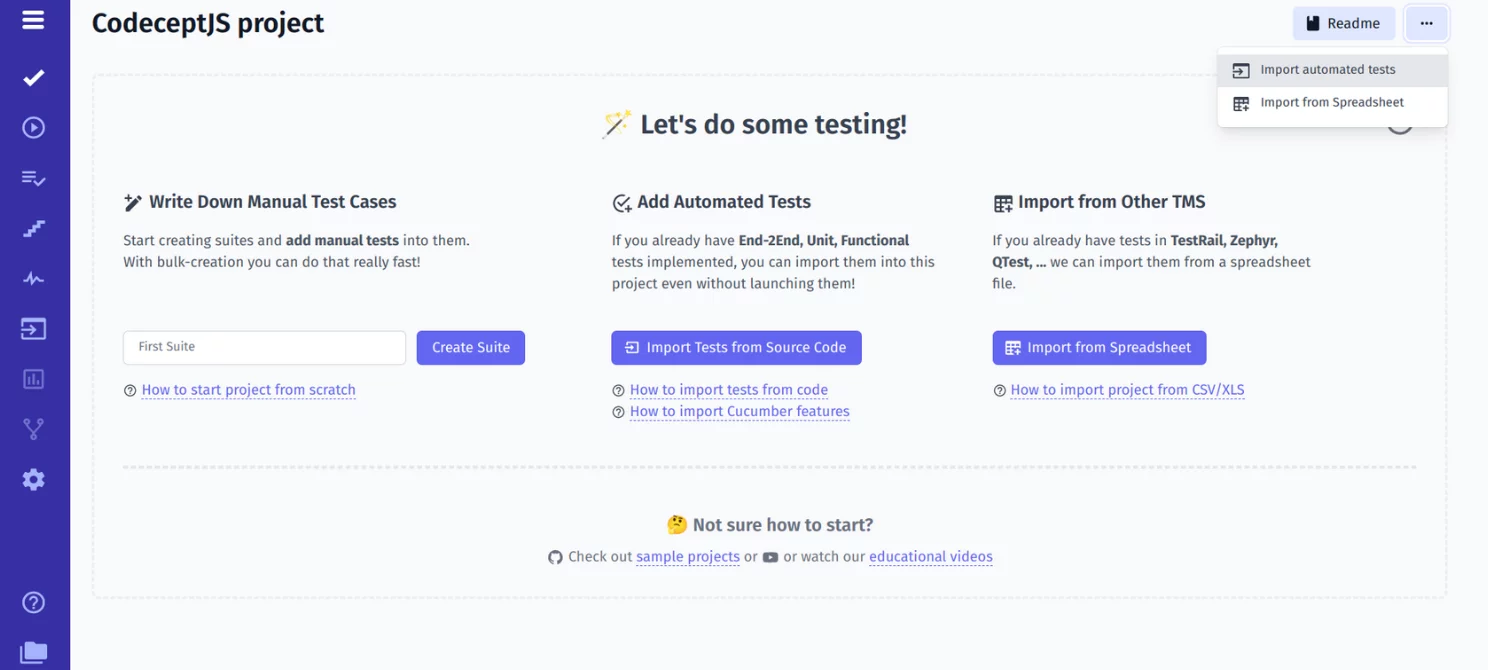
#2 Import Codecept automated tests into TMS
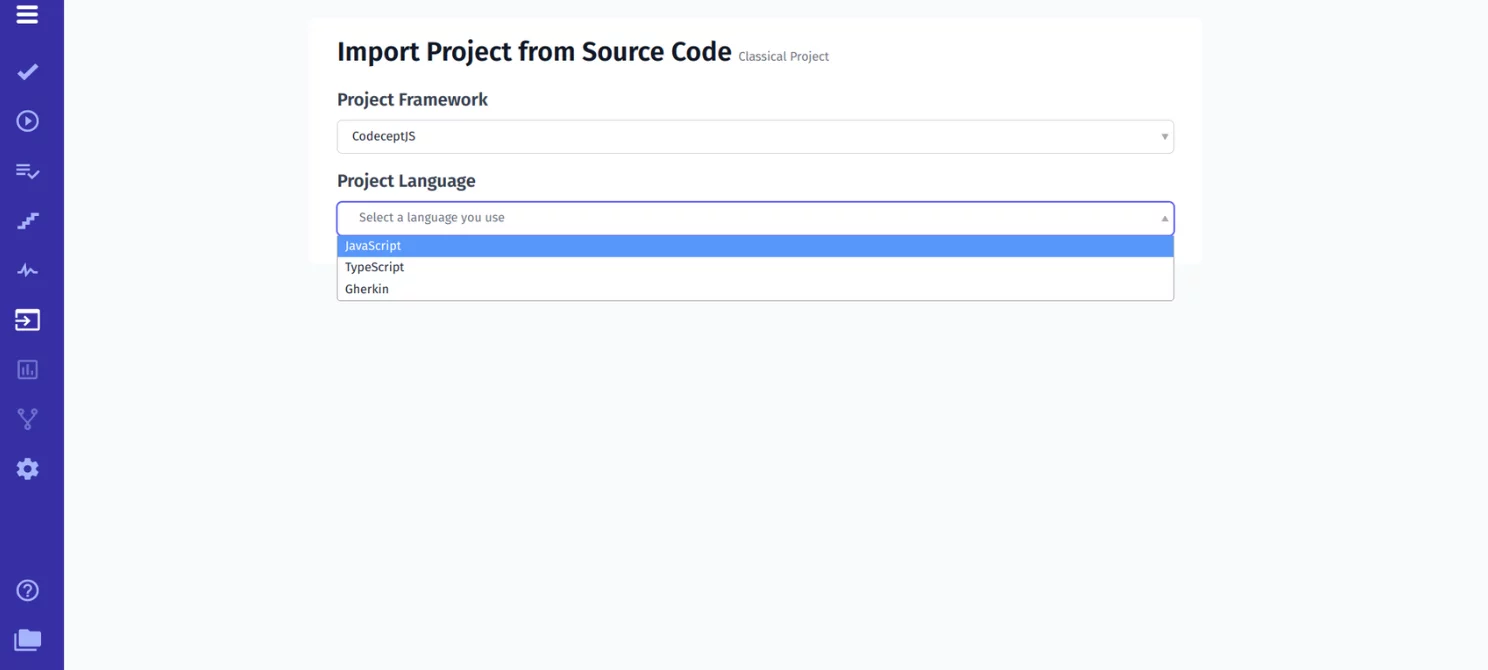
To import tests from the source code enter into your project and select Import automated tests in the drop-down menu.
After then Codecept.js and the JavaScript language from the respective lists. It works in the next combination with CodeceptJS:
- CodeceptJS+Javascript
- CodeceptJS+TypeScript
- CodeceptJS+BDD(Gherkin)
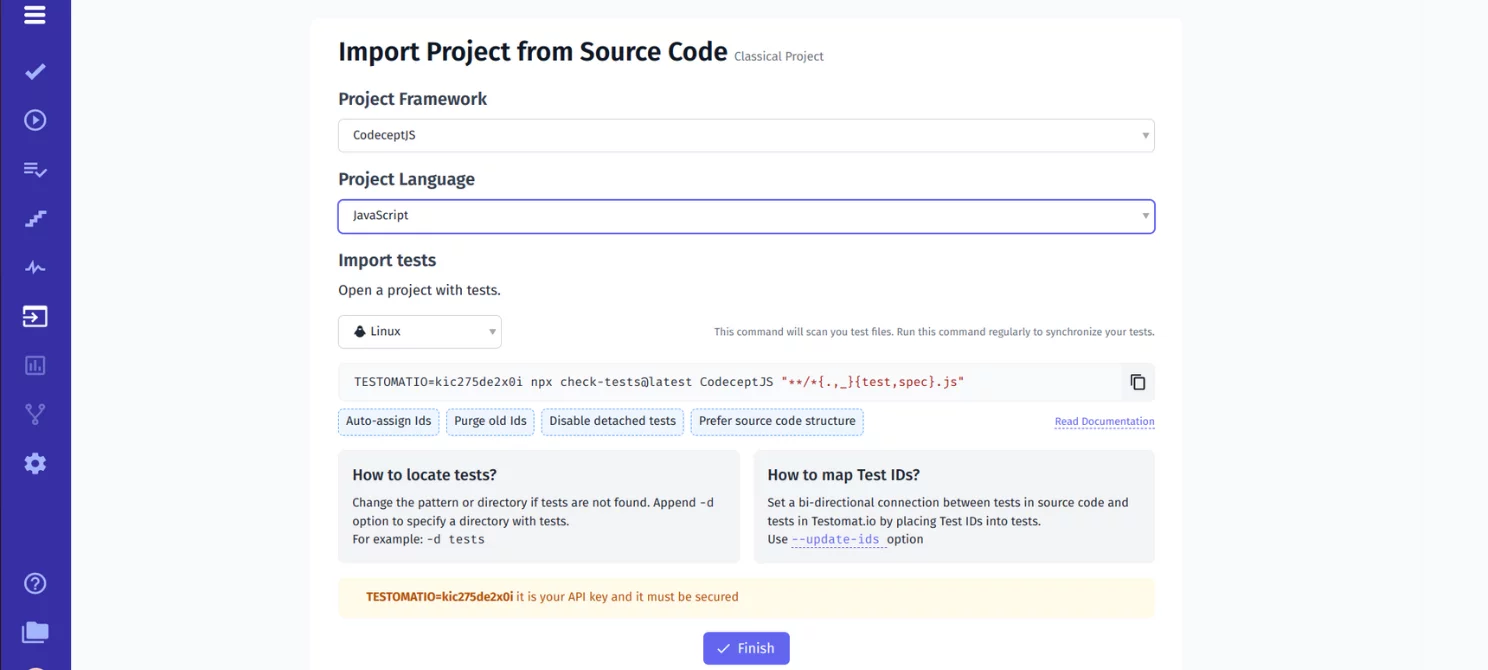
A special command line will be generated to execute on your AT repository. So, once your test cases are introspected, they will be sent to the test management system. The automated test cases synchronize the station TMS without a kind of customization.
You may see folders which you have in test management and like in the test automation repository. You can open the test case and see the implementation of test automation find then.

In addition, you can create test cases manually and then synchronize them with automatic tests written in Codecept.js.
Writing tests manually in TMS
To create a new test suite, do the following: New Suite → Title of Suite → Save. Under this test suite, you can quickly write test cases with descriptions using autocompletion from the steps’ database.
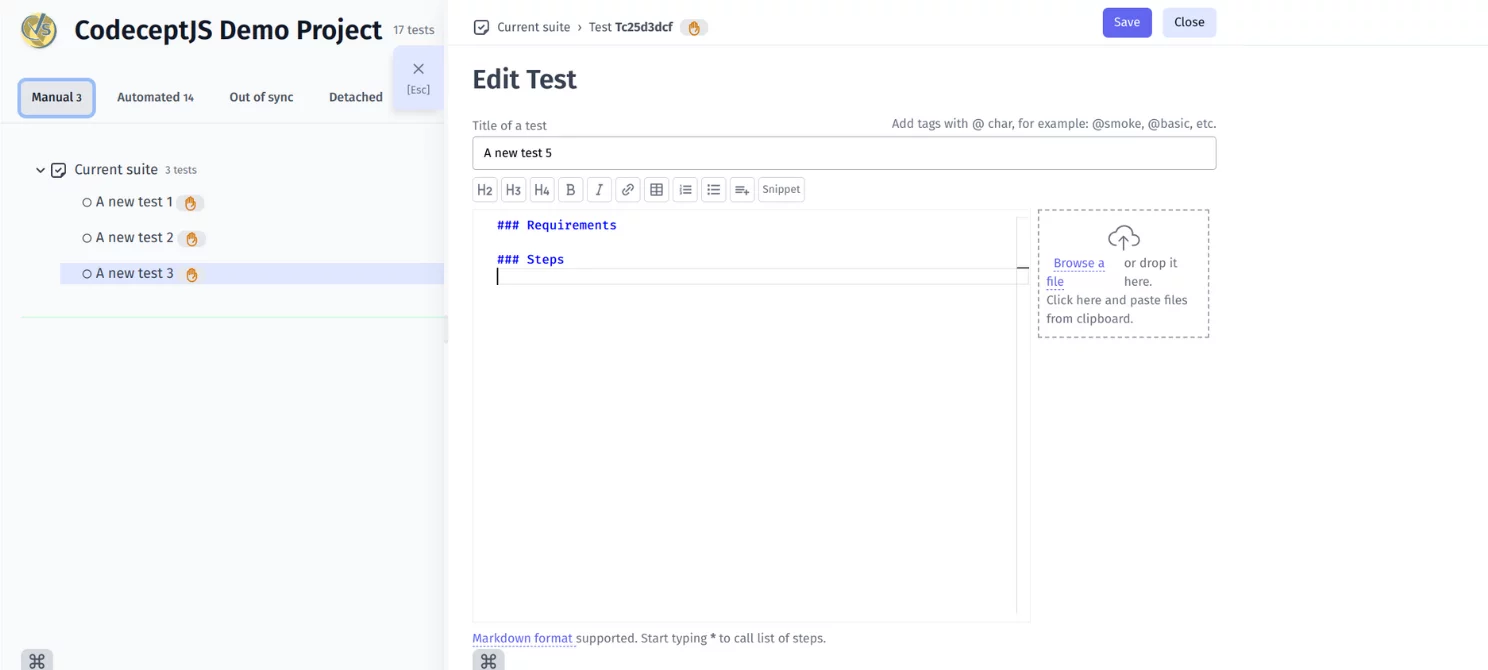
Edit Test has everything you need to change formatting, add tags, and attach files from the buffer. Code templates, attachments, and a history of the changes are available for each created test case.
#3 Install Reporter and configure the config file
To be able to track results, you need to configure a connection to testomat.io Reporter at the start. To do this, copy and paste the corresponding command into CMD.
npm i --save-dev @Testomat.io/reporter
#4 Configure .Conf File:
Also, add a test management plugin by copying the configuration offered by the system into the project.
plugins: {
  Testomat.io: {
    enabled: true,
    require: '@Testomat.io/reporter/lib/adapter/codecept',
    apiKey: process.env.TESTOMATIO,
  }
}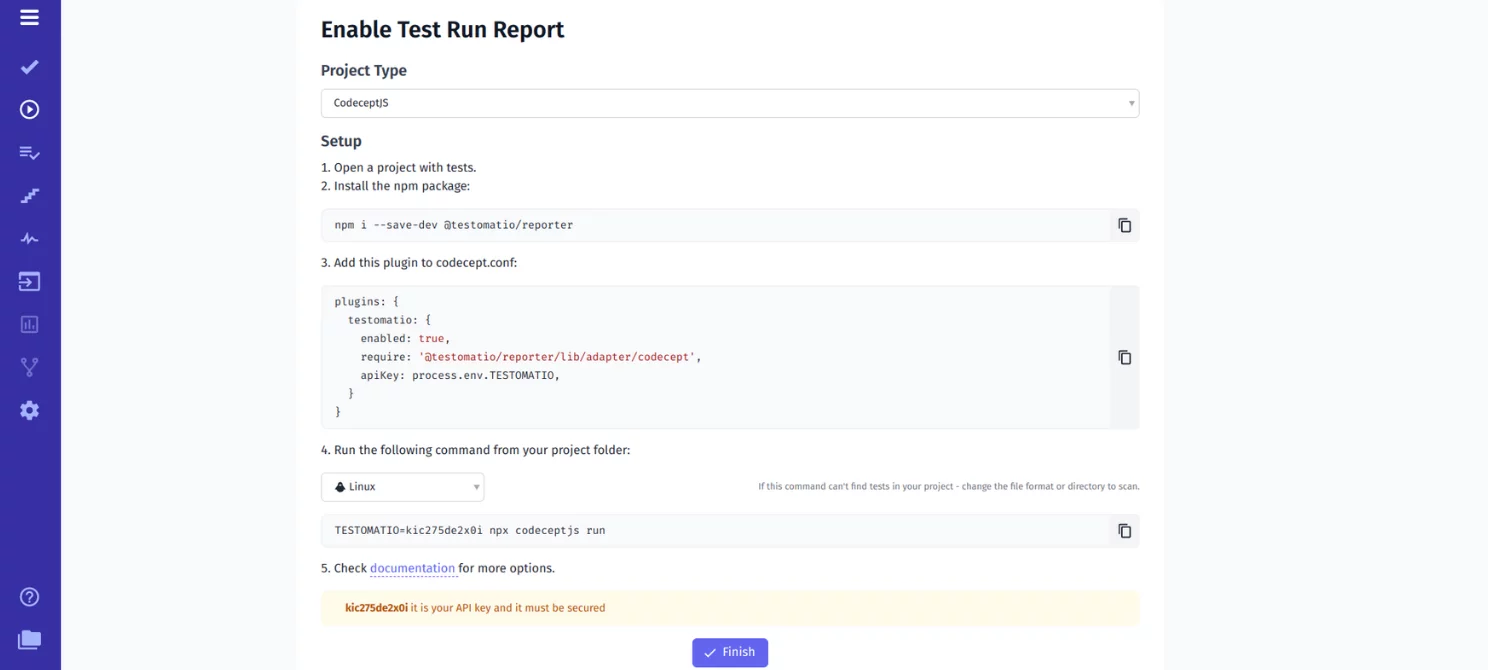
#5 Start a test run and generate the report in CodeceptJS
Now everything is ready to run tests. Now you can run your first test. Run the scripts by the following command:
TESTOMATIO_URL=https://app.testomat.io TESTOMATIO="API" npx codeceptjs runOnce the tests have finished running, the CLI will generate a report link. Test results will appear through the console on the test management dashboard and you may share them with your stakeholders immediately. You don’t have to wait for the process to complete – you will have real-time access to your data.
Thus, test management allows you to conveniently view test results thanks to beautiful reports. You can click on some test cases and see what exactly was executed. If any test fails, you will know all the details about it, which you can use to make end-2-end testing decisions. This will ensure the efficiency of the work.
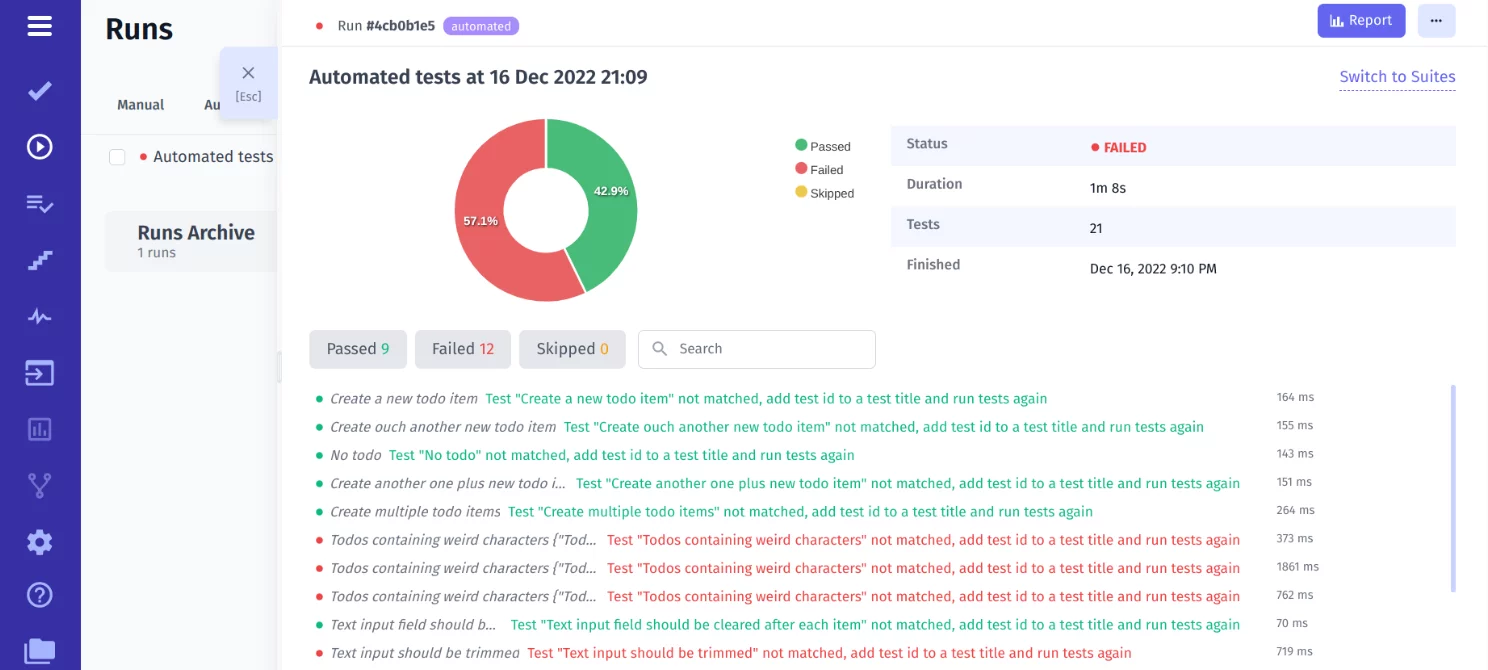
All of this applies to both automated and manual tests. Thus, your team has a valuable opportunity to control different types of tests in one place.
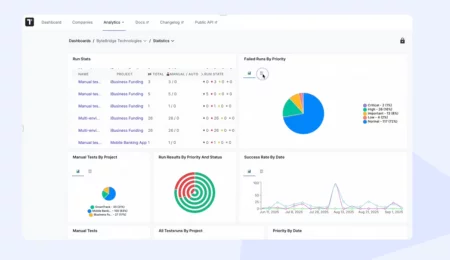
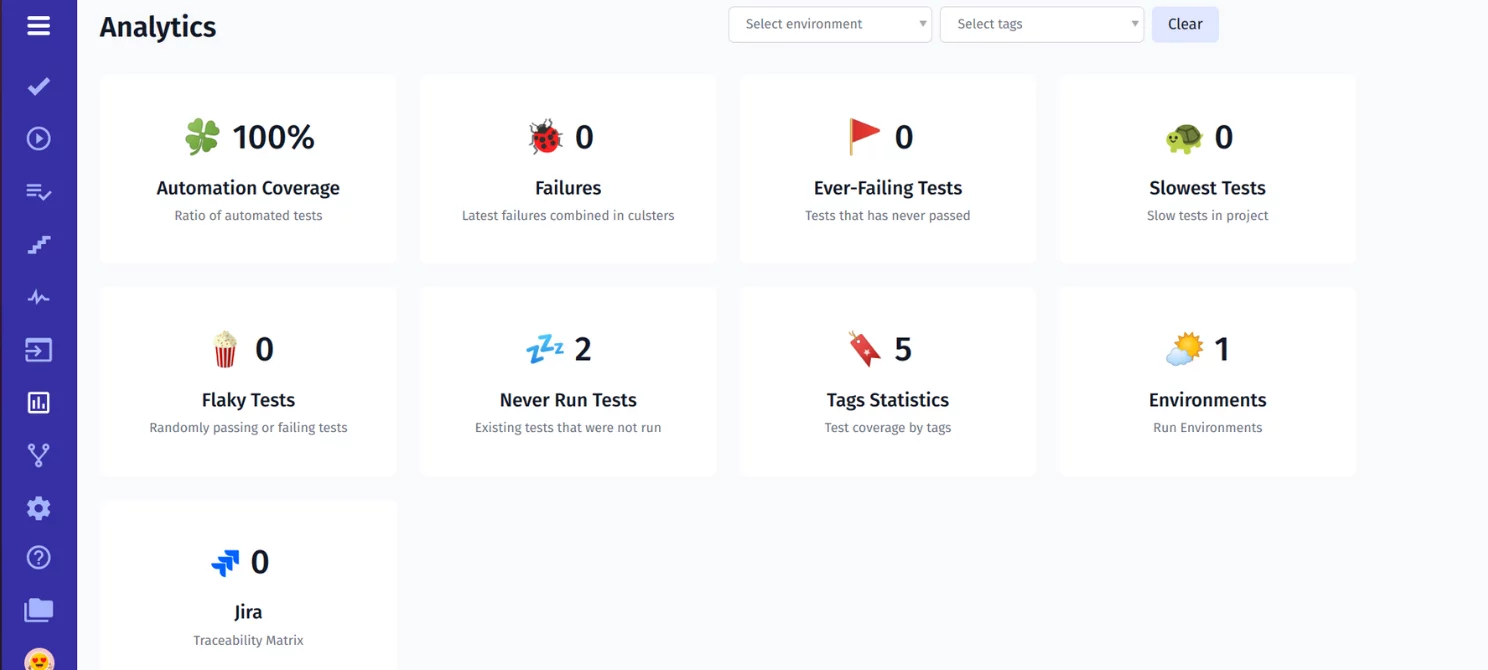
Our test solution provides the best analytics for CodeceptJS testing. Analytics based on detailed test reports allow you to dig deeper into test results and identify the causes of problems. You get access to up-to-date information about: automation coverage, defects, ever-failing tests, slowest tests, flaky tests and never run tests.
The following testing metrics are available on the Project Analytics dashboard and Global Analytics dashboard. Our team are currently working on expanding with new widgets.
Moreover, there is a Project Timeline or Pulse feature that keeps you up-to-date on project progress.
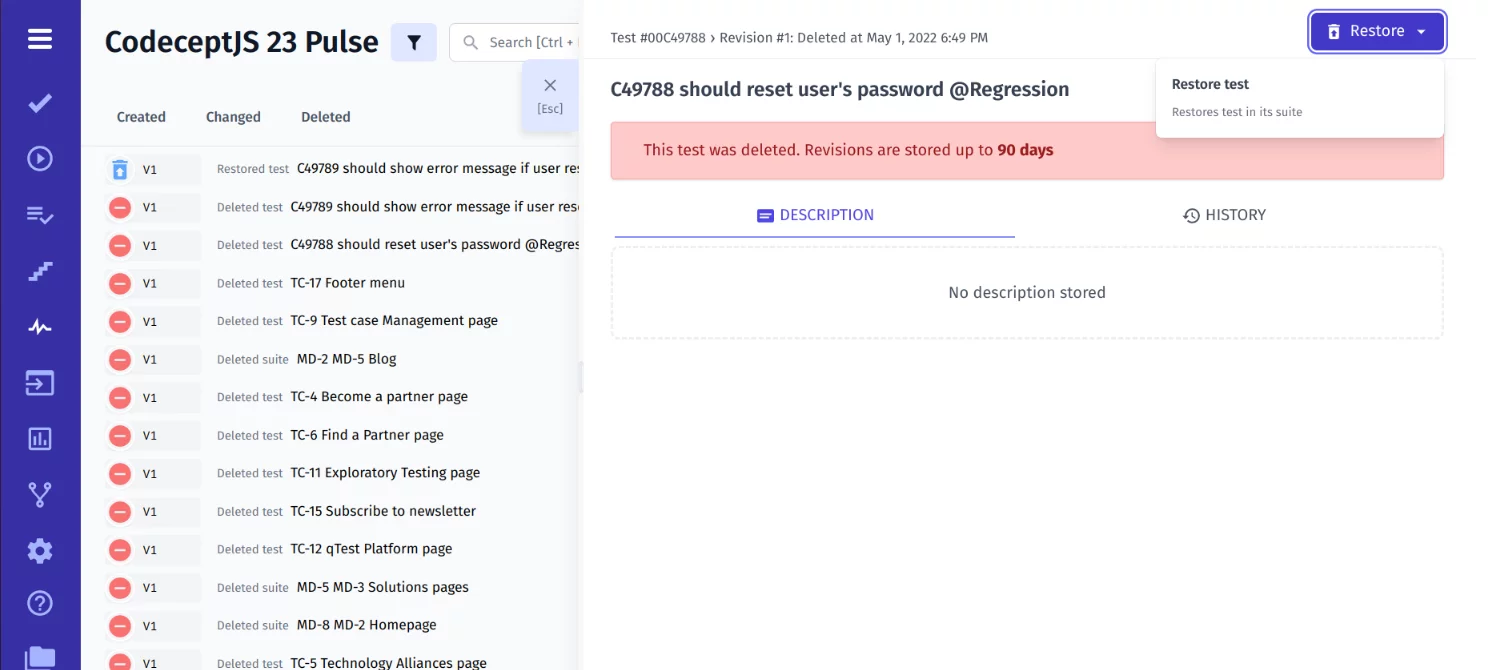
It displays the last activity with the date and time of the changes and the name of the user who made them. For tests that were changed or deleted by mistake, the Rollback / Restore to Previous Version function is available.
Running CodeceptJS Test On CI\CD
Test management provides seamless integration with popular CI\CD tools, including GitHub, GitLab, CircleCI, Jenkins, and Bamboo.
This is valuable for Agile teams because it allows for continuous feedback exchange, early error and bug detection, and efficient use of resources. As a result, the time to develop and release the product is reduced.
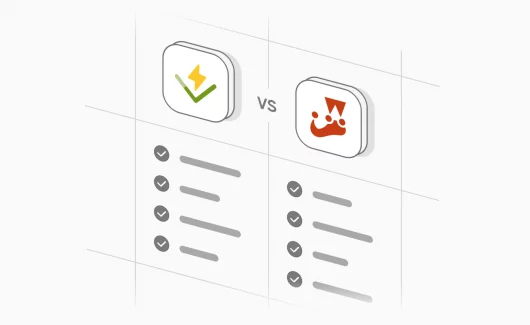
Comparison table: CodeceptJS VS TestCafe VS Cucumber
| CodeceptJS | TestCafe | Cucumber |
| Java script based E2E test framework. | JavaScript-based cross-browser test framework. | Ruby-based BDD testing framework. |
| Supports JavaScript. | Supports JavaScript/Typescript. | Multilingual framework (Ruby, Java, JavaScript, Scala, Perl, etc. are supported). |
| Parallel execution of tests based on run-workers and run-multiple engines is available. | It is possible to run tests in parallel. | Parallel testing is performed based on the TestNG and Maven modules. |
| Actively supported. | Actively supported. | Actively supported. |
| Google Chrome, Microsoft Edge, Firefox, Safari, and Electron. | Google Chrome (incl. mobile), Internet Explorer, Microsoft Edge (legacy and Chromium-based), Mozilla Firefox, Safari (incl. mobile). |
It is possible to use Cucumber with Selenium WebDriver, which supports these browsers: Opera, Firefox, Google Chrome, Internet Explorer, and Safari. |
| Tests are written in special BDD-style syntax from the user’s point of view. | The tests are Node.js scripts. | Gherkin language is used to write test cases. |
CodeceptJS is a great tool for a team interested in fast and flexible project work. You get a wide range of features in one framework for comprehensive web, mobile, and hybrid product assurance.
Using it in combination with our TMS, you will increase the transparency of work processes, speed up teamwork and involve non-technical experts in test management.
The content is available also in video format if you convenient reproduce the steps to visualize your tests and get an informative report by watching.