If you want your IT projects to grow, your technical teams and stakeholders without tech backgrounds do not suffer from misunderstandings during the software development process. You can use the BDD framework to connect the team on one page and keep everyone aligned.
In the article, you can discover more information about the Pytest BDD framework, learn how to write BDD tests with Pytest, and reveal some considerations to help you make the most of the Pytest BDD test framework.
Why teams need the Pytest BDD framework
If your team works on Python projects, pytest-BDD will give them a sizable boost in project clarity.
- Tech teams and non-technical business executives can take part in writing test scenarios with Gherkin syntax to describe the intended behavior of software in a readable format to make sure it meets business requirements.
- Teams can verify user stories and system behavior by directly linking them to feature requirements.
- Teams can make the test automation process more scalable with pytest’s features like fixtures and plugins.
- Teams can create a solid Steps base for test cases and reuse code in other tests by turning scenarios into automated tests.
- Teams can easily update BDD scenarios as the product changes.
- Teams can get detailed test reports with relevant information about the testing efforts.
Fixtures & Tags: Why use them?
With pytest-bdd, teams can use the power of the entire Pytest ecosystem, such as fixtures and tags.
Fixtures
Marked with the @pytest.fixture decorator, fixtures are known as special functions that provide a way to set up and tear down resources required for your tests. They are very flexible and have multiple use cases – applied to individual tests, entire test classes, or even across a whole test session to optimize resource usage. There are various reasons for using Pytest fixtures:
→ Fixtures are implemented in a modular manner and are easy to use.
→ Fixtures have a scope (function, class, module, session) and lifetime that help to define how often they are created and destroyed, which is crucial for efficient and reliable testing.
→ Fixtures with function scope improve the test code’s readability and consistency to simplify the code maintenance process.
→ Pytest fixtures allows testing complex scenarios, sometimes carrying out the simple.
→ Fixtures use dependency injection (configuration settings, database connections, external services) to improve test readability and maintainability by encapsulating setup and teardown logic.
While fixtures are great for extracting data or objects that you use across multiple tests, you may not use them for tests that require slight variations in the data.
Tags
Tags are a powerful feature that helps selectively run certain tests based on their labels. They also allow teams to assign tags to scenarios in feature files and use pytest to execute tests, especially when dealing with large test suites. Tags can be used to indicate test priority, skip certain tests under specific conditions, or group tests by categories like performance, integration, or acceptance. Let’s consider the reasons for using tags:
→ You need to run suites of tests that are relevant to your current needs, like testing a particular feature.
→ You need to group tests based on their functionality, priority, or other relevant criteria to easily understand the test suite structure and find specific tests in the future.
→ You need to execute tests that match multiple tags by using logical operators (AND, OR, NOT) to precisely target the tests you want to run.
→ You need to automate the execution of specific test subsets and get customized reports based on test tags.
While tags help categorize the tests based on any criteria, their overuse can lead to a cluttered test suite and make it hard for developers to understand or maintain the code.
In fact, Pytest has limitations, but it comes with many plugins that extend its capabilities, among them the Python BDD plugin, which we are interested in at this point in the article. This plugin provides all the advantages of Python in BDD, which is why many automators love it ❤️
Getting Started with Pytest BDD
Prerequisites: Setting up the environment
If you are ready to utilize pytest-BDD, you need to make sure that all the required tools and libraries are installed. Below you can find out the steps to follow to set up the environment and start writing BDD tests:
-
- Install Python. You need to download the latest version from Python’s official website to get Python installed on your system. Then you need to verify the installation by running the command:
python --version - I used the optional alias python to python3 (macOS/Linux only) because I saw messages: command not found, as python3 was installed instead of python.
alias python=python3 - I installed the package manager pip.
- Indeed, some test automation engineers prefer to use the Poetry library over Virtualenv. Poetry is more modern and enables management of dependencies in the global project directory without manually activating environments.
- Set up a Virtual Environment. At this step, you can create a virtual environment for your project to isolate it from other environments, give you full control of your project, and make it easily reproducible. Firstly, you need to install the virtualenv package if you haven’t already with pip. Once installed, you can specify the Python version and the desired name for the environment. It is a good practice to replace <version> with your Python version and <virtual-environment-name> with the environment name you want to give.
pip install virtualenv - Install pytest and pytest-BDD. At this step, you can use pip to install both the pytest framework and the Pytest-BDD plugin
pip install pytest pytest-bdd - Install Additional Dependencies. If you need additional libraries like Selenium or Playwright, you can install them as well. We need them to operate on a browser. For instance Playwright
playwright install - Activate
virtualenvbased on your OSsource venv/bin/activate - Create Feature Files and Steps File. The last step before writing the BDD tests is creating a structured project directory where you will keep your feature files and test scripts. Typical project structure looks like:
pytest_bdd_selenium/
├── features/
│   └── login.feature
├── steps/
│   └── test_login_steps.py
├── tests/
│   └── test_login.py
├── conftest.py
├── requirements.txt
└── pytest.ini
- Install Python. You need to download the latest version from Python’s official website to get Python installed on your system. Then you need to verify the installation by running the command:
How to write BDD Tests with Pytest
To write a BDD Test with Pytest, as mentioned above, you need to create a feature file and define step functions that match the scenarios in the feature file.
#1: Writing Feature File
To write feature files, you need to understand the Gherkin syntax used to describe the behavior of the application in plain English. The “given/when/then” vocabulary is pretty clear to all team members – analysts, developers, testers, and other specialists without technical background. Generally, the feature files work as living documentation of the system’s expected behavior. More information about Gherkin-based feature files can be found here.
Here is a basic example of a successful login functionality on this site https://practicetestautomation.com/practice-test-login/
Feature: Login functionality

  Scenario: Successful login with valid credentials
    Given the user is on the login page
    When the user enters valid username and password
    Then the user should see the secure area
#2: Creating Step Definitions
Step Definitions map the Gherkin steps in your feature files to Python functions. Pytest-bdd matches the steps in feature files with corresponding step definitions. Here is an example code for user login:
from pytest_bdd import scenarios, given, when, then

scenarios('../features/login.feature')

LOGIN_URL = "https://practicetestautomation.com/practice-test-login/"
USERNAME = "student"
PASSWORD = "Password123"

@given("the user is on the login page")
def open_login_page(browser_context):
    browser_context.goto(LOGIN_URL)

@when("the user enters valid username and password")
def login_user(browser_context):
    browser_context.fill("#username", USERNAME)
    browser_context.fill("#password", PASSWORD)
    browser_context.click("#submit")

@then("the user should see the secure area")
def check_login(browser_context):
    header = browser_context.locator("h1")
    assert "Logged In Successfully" in header.text_content()
* File test_login.py might be empty if all scenarios are loaded from a step file.
#3: Create Conftest file
Now, Playwright uses built-in fixtures like Page, and in many cases, we do not need it — Playwright provides everything.
You only need it if you want to:
- Add custom fixtures (e.g., for login tokens, DB, API)
- Change browser settings (e.g., headless, slow motion)
- Set up project-wide hooks
- Configure Playwright launch options
Our basic application is a login, so we have to create conftest.py
import pytest
from playwright.sync_api import sync_playwright

@pytest.fixture
def browser_context():
    with sync_playwright() as p:
        browser = p.chromium.launch(headless=False)  # set True for headless
        context = browser.new_context()
        page = context.new_page()
        yield page
        browser.close()
Using a Page, you can update your steps/test_login_steps.py file
from pytest_bdd import scenarios, given, when, then
from playwright.sync_api import Page

scenarios('../features/login.feature')

LOGIN_URL = "https://practicetestautomation.com/practice-test-login/"
USERNAME = "student"
PASSWORD = "Password123"

@given("the user is on the login page")
def open_login_page(page: Page):
    page.goto(LOGIN_URL)

@when("the user enters valid username and password")
def login_user(page: Page):
    page.fill("#username", USERNAME)
    page.fill("#password", PASSWORD)
    page.click("#submit")

@then("the user should see the secure area")
def check_login(page: Page):
    assert "Logged In Successfully" in page.text_content("h1")
#3: Executing PyTest BDD
Once the feature file and step definitions have been created, you can start test execution. It can be done with the pytest command:
pytest -v
#5: Analizing Results
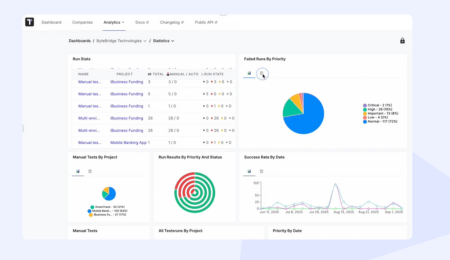
After PyTest BDD tests execution, you can analize, measure and review your testing efforts to identify weaknesses and formulate solutions that improve the process in the future.
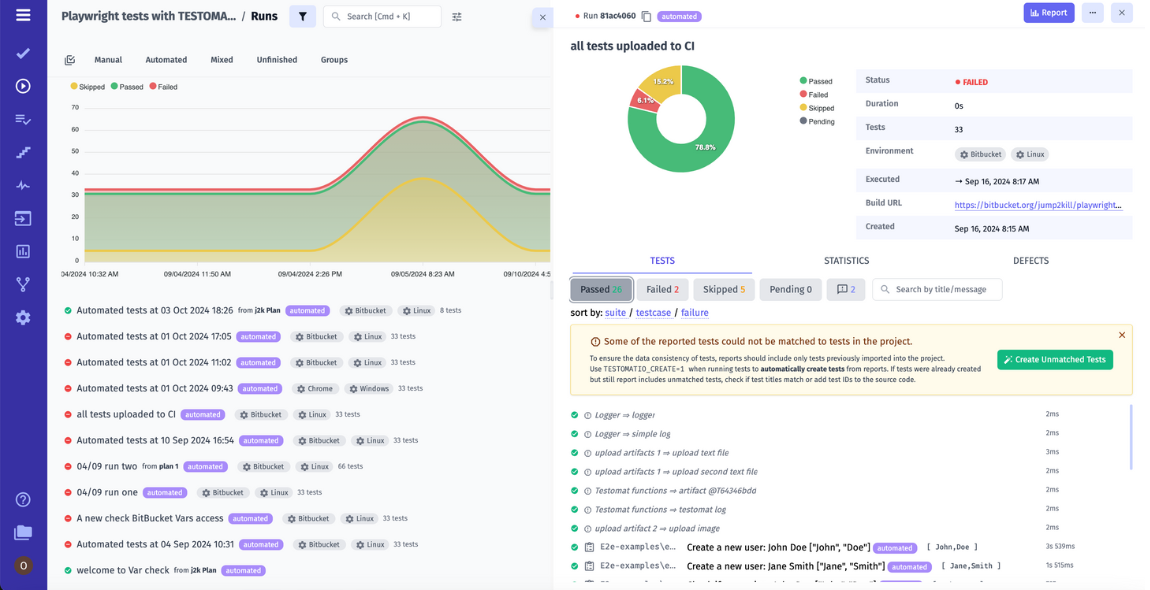
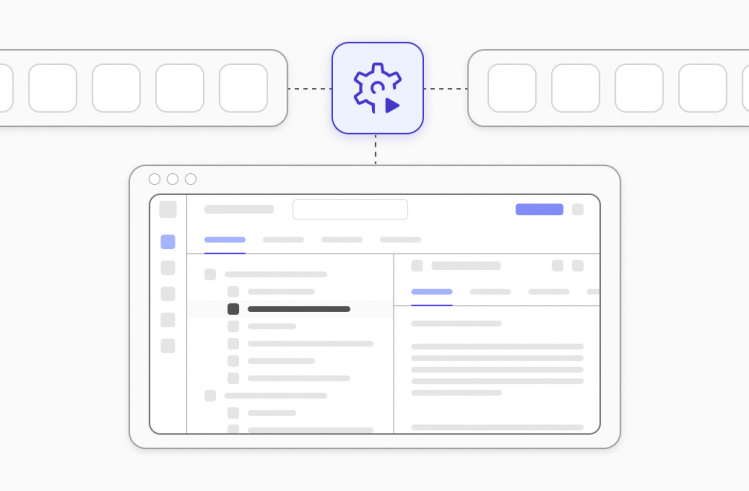
If you integrate pytest BDD with a test case management system such as testomat.io, you can generate test reports, analyze them, and get the picture of how your tested software performs.
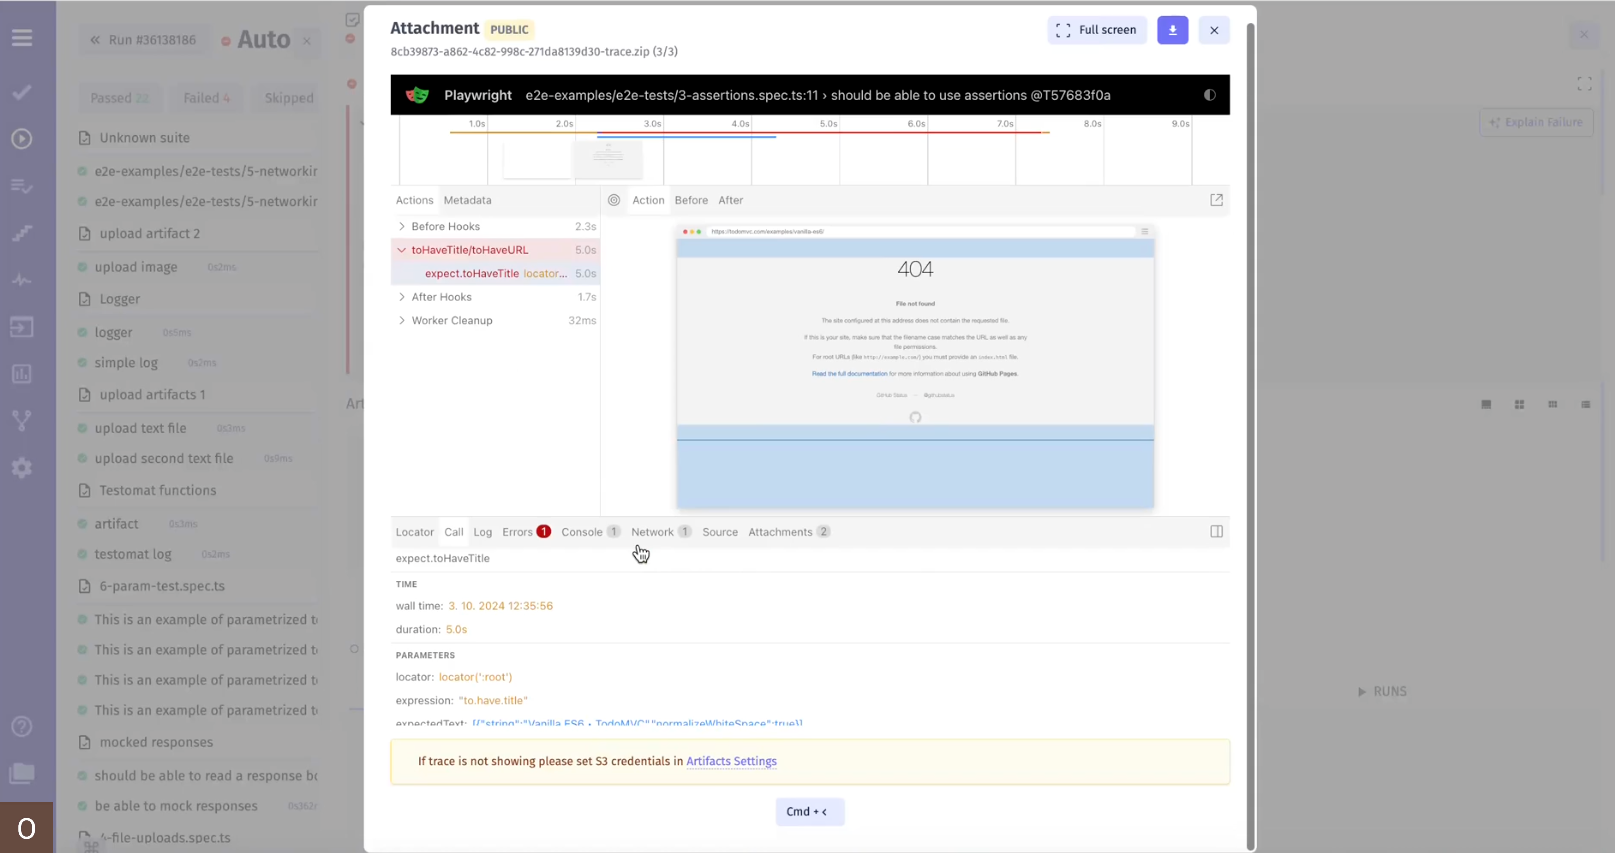
You can debug your Playwright tests right inside the test management system for faster troubleshooting and smoother test development.
Advantages of Pytest BDD
- Pytest BDD works flawlessly with Pytest and all major Pytest plugins.
- With the fixtures feature, you can manage context between steps.
- With
conftest.py, you can share step definitions and hooks. - You can execute filtered tests alongside other Pytest tests.
- When dealing with functions that accept multiple input parameters, you can use tabular data to run the same test function with different sets of input data and make tests maintainable.
Disadvantages of Pytest BDD
- Step definition modules must have explicit declarations for feature files (via
@scenarioor the “scenarios” function). - Scenario outline steps must be parsed differently
- Sharing steps between feature files can be a bit of a challenge.
Rules to follow when using Pytest BDD for Test Automation
Below you can find some important considerations when using Pytest-bdd:
- You need to utilize Gherkin syntax with GWT statements.
- You need to use steps as Python functions so that pytest-bdd can match them in attribute files with their corresponding step definitions to be parameterized or defined as regular Python functions.
- You need to utilize the pytest-bdd and pytest fixture together to set up and break down the environment for testing.
- Each scenario works as an individual test case. You need to run the BDD test using the standard pytest command.
- You can use pytest-bdd hooks to generate code before or after events in the BDD test lifecycle.
- You can use tags to run specific groups of tests, prioritize them, or group them by functionality.
Bottom Line: Ready to use Pytest BDD for Python project?
With pytest-BDD, your teams get a powerful framework to implement BDD in Python projects. When writing tests in a clear and Gehrkin-readable format, teams with different backgrounds can better collaborate, understand business requirements, and build what the business really needs. Contact us if you need more information about improving your Pytest BDD workflow and its integration with the testomat.io test case management system and increasing test coverage.