

More businesses build web apps with the Angular framework. While it helps them deliver rich user experiences, ease of access, speed, and productivity, they also need to thoroughly test them.
Recently, QA teams started to test Angular applications in an alternative way – using Jest. It happened in terms of Jest’s speed and unit-focused conception. Let’s discover how to utilize Jest for Angular component testing!
What is an Angular component?
In Angular documentation, the component is the main building block that includes the data and UI logic and defines the styles of the View which is to be displayed at the target app. Each component in Angular has three elements:
- HTML template. With Angular-specific syntax for data binding, directives, and event handling, it defines the view/structure of the component directives and updates the UI based on user interactions and dynamic data changes.
- TypeScript class. It contains the component business logic – processing user inputs, handling data, or interacting with services – and defines properties, methods, and lifecycle hooks that control the behavior of the component.
- Metadata. It provides additional information about Angular’s components (selector, template, style, and other properties) to understand how it should be used within the application at run time execution.
Angular Component LifeCycle
Every Angular component goes through a few different stages called lifecycle hooks that help software developers execute the custom logic of the app. They are the following:
- Creaction. The component is created and its dependencies are injected.
- Change Detection. Angular checks for changes in the data-bound properties.
- Rendering. The component’s template is rendered or updated.
- Destruction. The component is destroyed and cleaned up.
Angular executes lifecycle hooks to help developers execute code at specific stages of the component’s lifecycle:
ngOnChanges– a method that responds when a change in the parent component needs to trigger an action in the child component to keep them in sync.ngOnInit– a method that initializes the component after Angular has set the input properties.ngDoCheck– a method that detects and responds to changes in the component’s input properties.ngAfterContentInit– a method that is executed after the component’s content has been initialized.ngAfterContentChecked– a method that responds after Angular checks the content projected into the directive or component.ngAfterViewInit– a method that is called when the bindings of the children’s directives (or components) have been checked for the first time.ngAfterViewChecked– a method that is called after every check of the component’s views.ngOnDestroy– a method that is triggered when a component/directive is going to be destroyed.
Why you should unit test?
When it comes to component angular testing, you need to take into account the unit tests. They have a focus on testing small and isolated pieces of code.
With unit tests, you can get information on how the code should behave and understand what the code is doing without the need to have external resources. They guarantee that every component of your application operates as intended when used alone.
Why you should mock?
To make sure you can concentrate on the code that has to be tested, you must properly mock external dependencies. Mocking means creating a replica of any external dependencies in your code. You replace the services, functions, or objects that your code interacts with, with a fake version that mimics the original dependencies. Still, they do not need to replicate all their functionalities.
Mocking dependencies in Angular tests replace a dependency with a simulated object that can imitate its behavior and interactions. In this type of test, you can replace the services, functions, or objects that your code interacts with, with a fake version that mimics the original dependencies. Still, they do not need to replicate all their functionalities.
However, when you use mocks in your tests in Angular unit testing, you should take into account the following:
→ The mock should have the same methods, properties, and return types as the original dependency.
→ In the context of the test, the mock needs to be detailed enough to act as the original.
→ If you change the original dependency, you need to update the mocks to avoid false positives in tests.
✅ Advantages of mocking
- When mocking, you test only the component’s logic and don’t need additional recourses.
- You run tests faster as you don’t have to wait for real dependencies to respond.
- You receive consistent test results as mocks replicate the original dependencies and behave the same way.
- With mocks, you can detect issues by simulating scenarios that are difficult to reproduce in a real environment.
- When mocking, you isolate tests to be executed in parallel for faster testing.
❌ Disadvantages of not mocking
- In real implementation, you have been forced to mock all of the properties, methods, etc. and the scope of your test expands.
- You have to declare the nested components and provide all of its dependencies.
- It takes longer for your tests to execute since the complete dependency tree must be resolved first.
- The test state might include errors.
- In terms of dependency downstream changes, tests can start indicating problems.
- You face difficulties when debugging the tests.
- Refactoring becomes harder because you can’t easily isolate the tests.
- It is getting longer to detect failures because they could originate in any of its dependencies or, for example, deep in the tree.
Angular Component testing: Playwright VS Jest?
Jest
- Specifically designed for unit tests. In Jest, you can isolate and test small code units. This means that Jest’s concept aligns with the concept of unit testing components.
- Rich toolset. It includes all the necessary tools and features to carry out unit testing – mocking, spying, and assertion libraries.
- Fast Test Runs. Without the need for real dependencies, you can run unit tests very quickly and avoid test flakiness.
- Better code coverage. Jest can be integrated well with code coverage tools to track a unit testing process and generate a component’s code coverage.
- Integration with Angular. Developers can set up and run tests with ease in terms of Angular’s built-in support for Jest.
- Large community and excellent documentation. If you have difficulties with the project, you can look through well-prepared documentation, find examples of Jest plugins, or ask questions to the active community.
Playwright
- Real Browser Environment. With Playright, you can test your project against actual browser rendering and behavior without the need to mock the DOM.
- Auto-waits Option. When testing component interactions, Playwright’s auto-waits feature allows you to easily conduct asynchronous testing without the need to control timeouts within manually playwright component testing.
- No use of globals. Playwright does not use any globals for its test runner so that can quickly and reliably verify the behavior of each component without the need to introduce complex synchronization mechanisms to modify global variables.
- Easy Setup. If you carry out e2e testing in Plywright, you can also use it for Playwright component unit testing without the need for a separate testing environment.
We know that Playwright is better for e2e testing, but it can be also used for Playwright component testing angular or unit testing other JavaScript Apps. Especially, if you aim to test components, which have complex interactions with other UI parts or if you need to verify interactions of the component within the DOM.
These topics might be interesting for you:
Playwright Component Testing as Modern Alternative to Traditional Tools
Cypress Component Testing and its Implementation (React Example)
As for Jest, it is a better choice for isolated unit tests. With all the necessary features to write effective unit tests for Angular components, Jest has a focus on isolation, mocking, and speed, and helps developers test the logic of the components reliably.
| Feature | Jest | Playwright |
| Primary Focus | Isolated Unit Testing | E2E & Component Interaction |
| DOM Access | JSDOM (Mocked) | Real Browser (Chromium/WebKit/FF) |
| Speed | Extremely Fast | Fast (Real browser overhead) |
| Best For | Logic-heavy component tests | UI-heavy & User flow tests |
Setup Jest in an Angular project
Prerequisites
To create unit tests for Angular applications, you should have a basic understanding of the following concepts:
- Angular fundamentals
- JavaScript
- HTML
- CSS
- Angular CLI
From the very start, check the version of existing Node.js and Angular installations on your system using the following commands:
node --version

ng version //to check Angular version
Dependencies Configuration
Also, you need to install Jest with Angular dependency with the following command:
npm install --save-dev jest jest-preset-angular @types/jest
You can check are some missed dependencies in your Jest configuration or all is okay with command:
npx ng test --show -config -printNext, you should create a jest.config.ts file, fill it with the Angular preset, and point. Be sure, that it contains the right settings inside:
import type { Config } from 'jest';

const config: Config = {
  preset: 'jest-preset-angular',
  testMatch: ['**/+(*.)+(spec).+(ts)'],
  testEnvironment: 'jsdom',
  setupFilesAfterEnv: ['<rootDir>/src/setup-jest.ts'],
  globals: {
    'ts-jest': {
      tsconfig: '<rootDir>/tsconfig.spec.json',
      stringifyContentPathRegex: '\\.html$',
    },
  },
  transform: {
    '^.+\\.(ts|js|mjs|html)$': 'jest-preset-angular',
  },
  moduleFileExtensions: ['ts', 'js', 'html', 'json', 'mjs'],
  moduleNameMapper: {
    '\\.(css|less|scss|sass)$': 'identity-obj-proxy',
  },
  transformIgnorePatterns: ['node_modules/(?!@angular|rxjs)'],
};

export default config;
This check might be critical for our test project because, in the next try to execute tests, I found Jasmine’s settings and changed them by Jest instead 👀 similarly in an older project Karma was represented.
🔴 Pay attention setupFilesAfterEnv we can configure it differently. One of the options is to write down it in the package.json file:
"jest": {
  "preset": "jest-preset-angular",
  "setupFilesAfterEnv": ["<rootDir>/src/setup-jest.ts"],
  "transform": {
    "^.+\\.(ts|js|html)$": "jest-preset-angular"
  },
  "transformIgnorePatterns": [
    "node_modules/(?!@angular|rxjs)"
  ],
  "moduleFileExtensions": ["ts", "js", "html"],
  "testEnvironment": "jsdom"
}
The @types/jest package provides type declaration files for Jest and allows TypeScript to perform type checking and support for Jest-specific APIs, functions, and matches. To run Angular unit tests with Jest, you need the jest-preset-angular package with the following features:
- the ts-jest library included in
@types/jestspeeds up integration between TypeScript and Jest as well as allows Jest to compile in-memory TypeScript code. @types/jestprovides specialized serializers for Angular components in Angular component testing to improve snapshot testing capabilities by enabling easy comparison and validation of component snapshots.- AST transformers in
@types/jestmodify Angular component code during testing, removing CSS styles and inlining HTML templates to guarantee compatibility with JSDOM without the need to rely on external resources.
Eventually, you can not paste settings in the package.json, as in another way you can make setupFilesAfterEnv configuration with setup-jest.ts file:
counter-testing/
│── src/
│   ├── setup-jest.ts  <-- ✅ Create this file
│   ├── app/
│   ├── assets/
│   ├── environments/
│── jest.config.ts
│── package.json
│── tsconfig.spec.json
The setup-jest.ts file provides:
import 'jest-preset-angular/setup-jest';
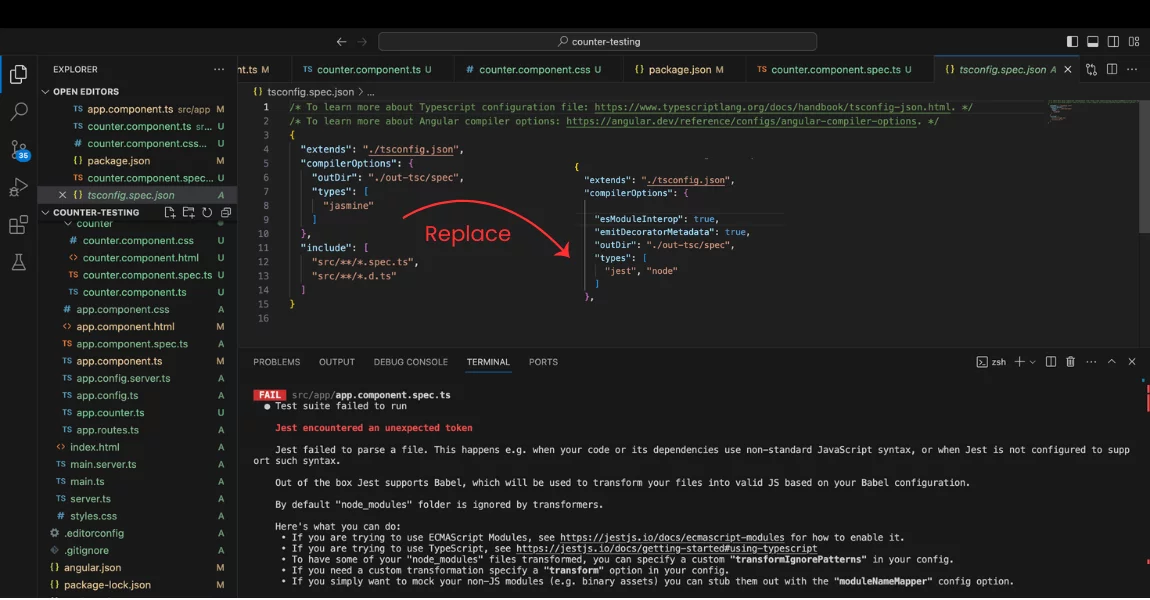
The next step is the declaration tsconfig.spec.json file using the command below:
{
  "extends": "./tsconfig.json",
  "compilerOptions": {
    "outDir": "./out-tsc/spec",
    "types": ["jest", "node"]
  },
  "files": ["src/setup-jest.ts"]
}
This command initializes Jest in your project and creates a jest.config.js file:
npx ts-jest config:initExample of jest.config.ts for Angular testing project to provide a guided setup process:
import type { Config } from 'jest';

const config: Config = {
  preset: 'jest-preset-angular',
  testMatch: ['**/+(*.)+(spec).+(ts)'],
  testEnvironment: 'jsdom',
  setupFilesAfterEnv: ['<rootDir>/src/setup-jest.ts'],
  globals: {
    'ts-jest': {
      tsconfig: '<rootDir>/tsconfig.spec.json',
      stringifyContentPathRegex: '\\.html$',
    },
  },
  transform: {
    '^.+\\.(ts|js|mjs|html)$': 'jest-preset-angular',
  },
  moduleFileExtensions: ['ts', 'js', 'html', 'json', 'mjs'],
  moduleNameMapper: {
    '\\.(css|less|scss|sass)$': 'identity-obj-proxy',
  },
  transformIgnorePatterns: ['node_modules/(?!@angular|rxjs)'],
};

export default config;
Make sure tsconfig.spec.json includes:
{
  "compilerOptions": {
    "esModuleInterop": true,
    "emitDecoratorMetadata": true
  }
}
Achoo, as you can see the configuration of Jest in the Angular project is quite routine 🤯
Use these tutorials, they help you much:
- Angular Testing: Past, Present, and Future by Rainer Hahnekamp
- TDD — Unit Testing TypeScript project with Jest by Ivan Dimitrijevic
- How to configure Jest with TypeScript by Jelena Durovic
Create your first component test with Jest
Before writing unit tests, you need to reduce the scope of tests and test the smallest possible code units to minimize finding bugs and prevent code breaking in the future. You can use the following functions:
- describe the function to group tests
- it function to define a test
- expect a function to make assertions
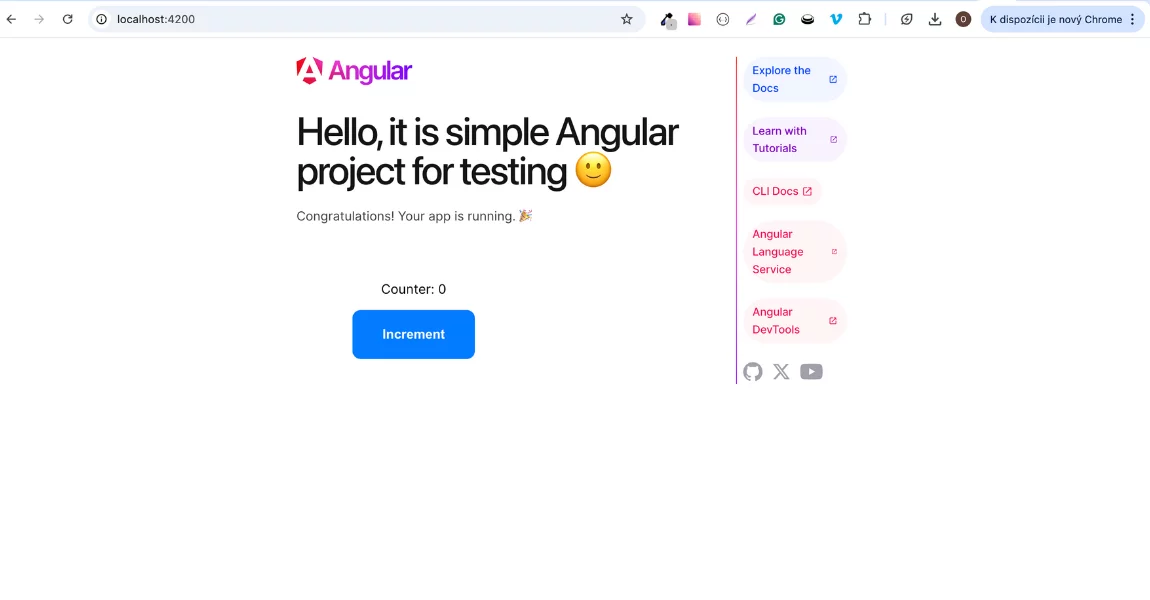
The entity where we implement Jest Angular component unit testing is the name.component.spec.ts and obviously our runner looking for the file in such format. Here are a few examples of the first test in Jest(test suite) for a simple Angular counter App:
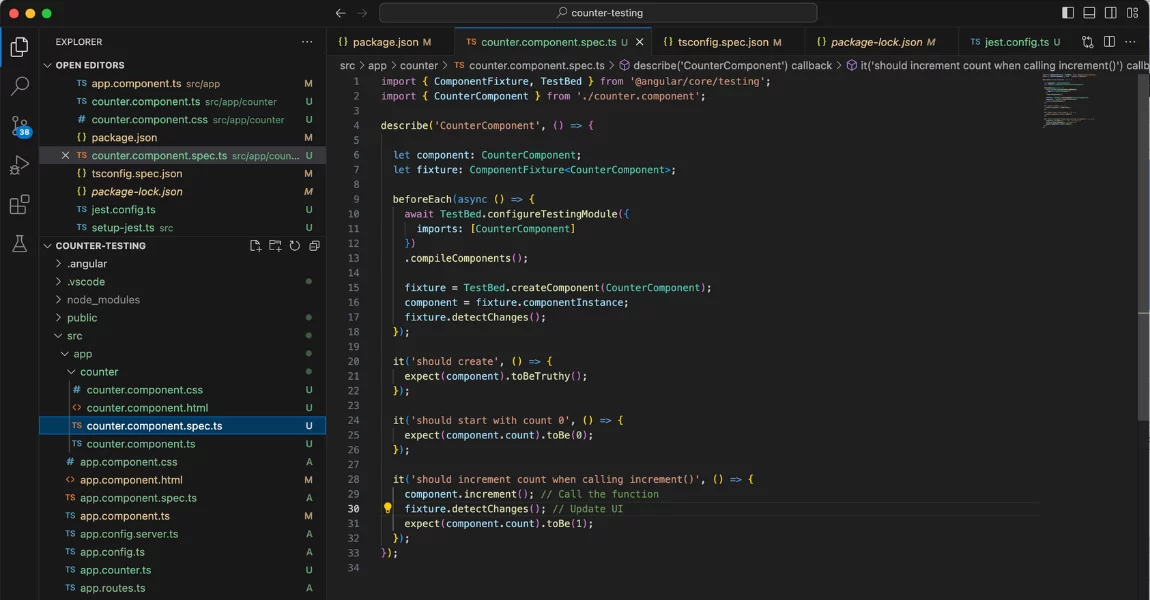
Run & Report your tests
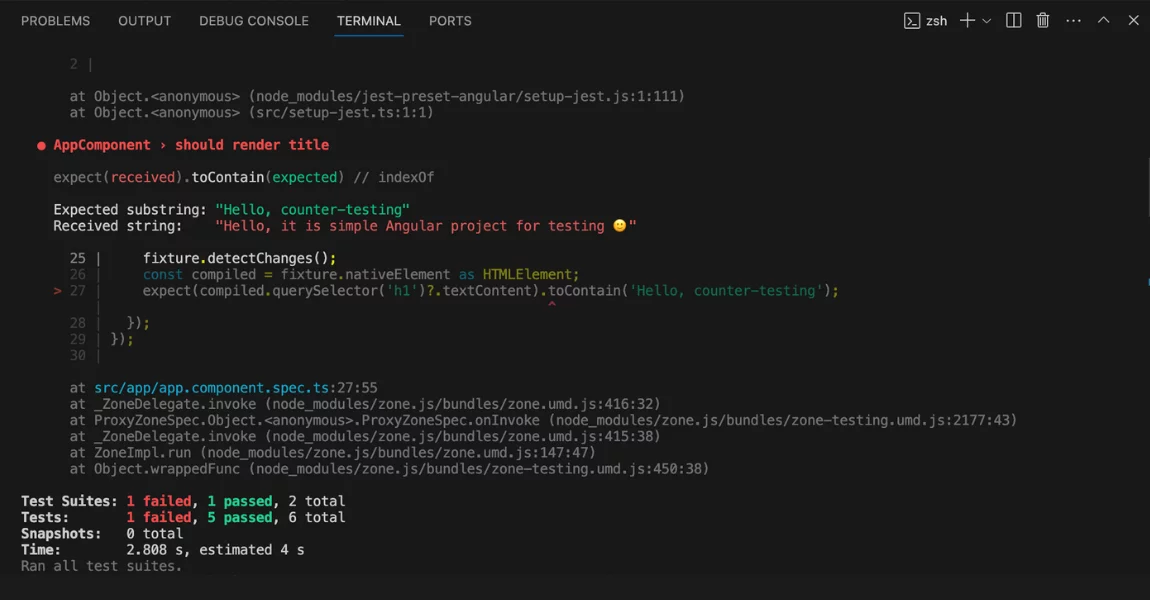
To run your Jest tests, you need to use the ng test command to see the test results in the console.
npx ng test
The results include information about executed tests, their status (passed/failed), test run summary, and error messages for failed tests. Also, you can use the ng test – coverage command to generate coverage reports. It will be HTML reports that you can open in your browser and find coverage details.
If you like, to receive more informative Reports for your automation we recommend the testomat.io test management solution. At first, make import:
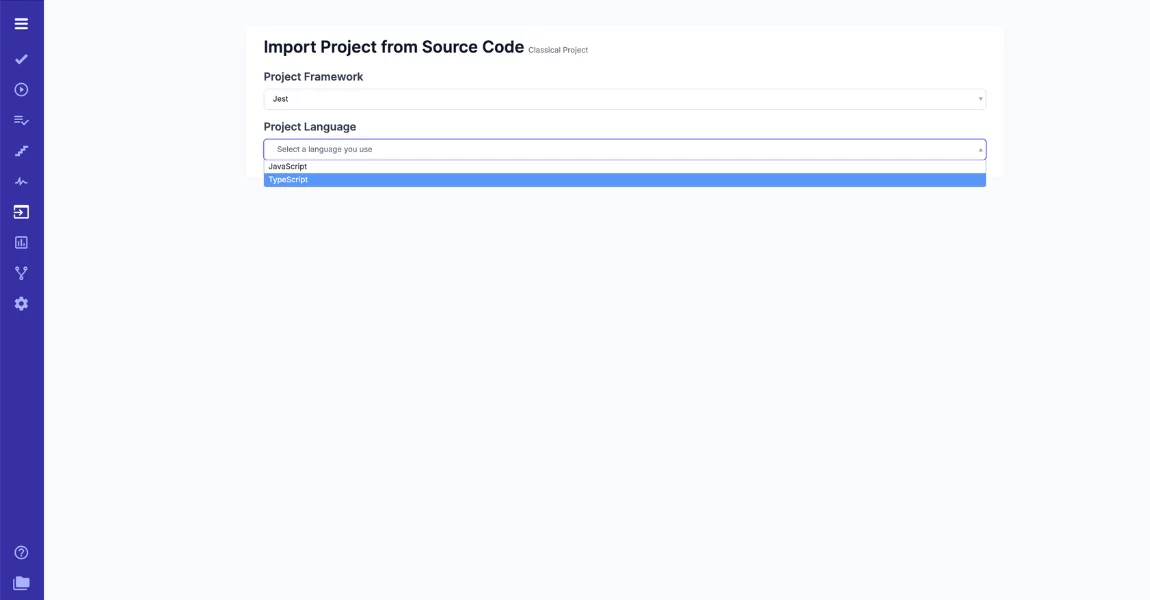
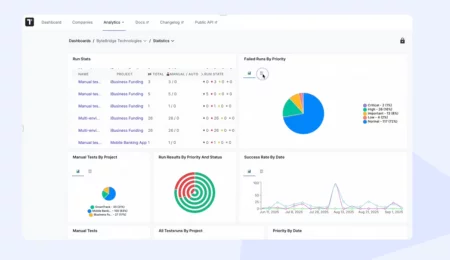
After running your Angular test framework you can see such report which includes your manual efforts in one place. Many QA teams are looking for this capability in test management.
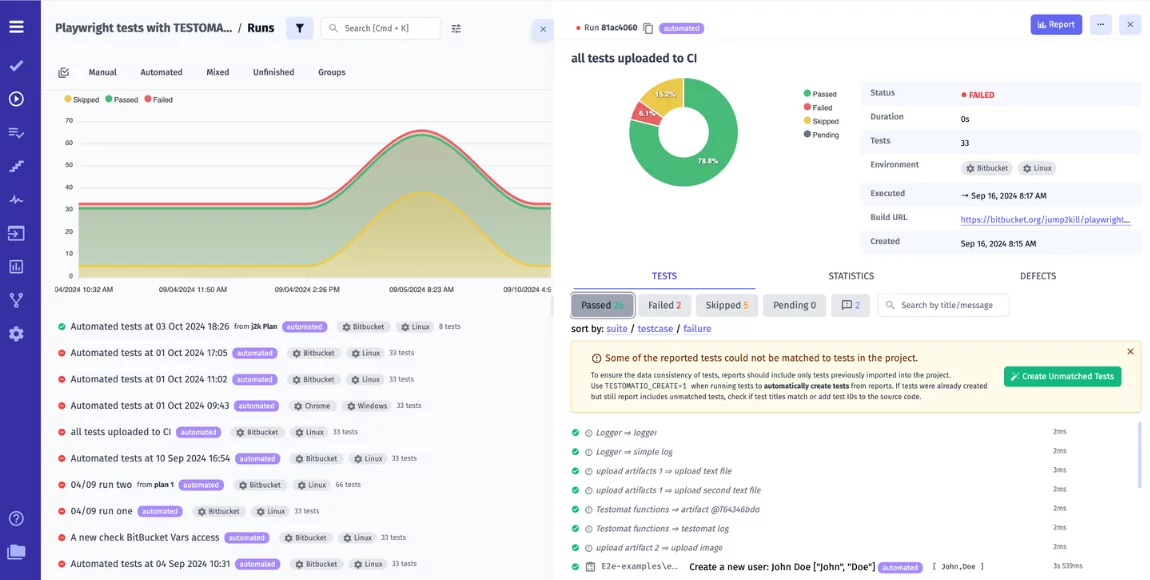
Professional Reporting for Jest Angular
Running tests in your local console is great for development, but it’s a bottleneck for your team. When test results are scattered across individual developer machines, you lose visibility into your overall project health and quality metrics.
That’s where testomat.io takes over. By integrating our reporter into your Jest configuration, you get:
-
Centralized Dashboards: See all test runs (Jest, Playwright, Cypress) in one place.
-
Jira Integration: Map your Angular unit tests directly to Jira tickets.
-
Real-time Analytics: Track flakiness and coverage across the entire SDLC.
Connect your Jest framework to testomat.io and stop guessing about your code quality.
Challenges during testing and best practices to solve them
When teams work on Angular-based projects and test them, they face some most common challenges like the following:
- They write tests with too complex logic or even mix UI logic with business logic, which makes it too hard to isolate and conduct QA testing. That’s why it is important to write tests with clear logic and divide large components into smaller and manageable parts.
- It is difficult to test components with complex interactions. So, you should break test components into smaller ones and run them independently of one another to provide more accurate results of Angular component testing.
- There are flaky tests, which periodically can pass or fail, and brittle tests, which can break in terms of tiny test code changes. To solve issues in terms of brittle tests, you need to mock only external dependencies while trying to isolate flaky tests to define and fix the root cause.
- They may use outdated documentation that increases misunderstanding about the code being tested. With that in mind, teams should maintain the documentation and add clear comments to the source code so that every team member involved is on the same page.
In addition to that, there can be refactoring challenges, test setup issues, debugging complex test failures, problems with test integration in CI\CD pipelines, lack of code reviews, etc.
Bottom Line: What about Angular Component Testing with Jest Framework?
By testing the smallest Angular components – basic building blocks, teams can increase efficiency in the QA process. They can modularize code, improve maintainability, and promote reusability, simplifying the scalable and dynamic Angular application development.
👉 Don’t hesitate to drop us a line if you are interested in Angular component testing with Jest or have any related questions.