


Manual testing happens in the browser, and you read the test case in a different tab. The World Quality Report from Capgemini says 57% of organizations name the lack of a complete test automation strategy as a barrier, so a large share of QA work stays manual. The Testomat.io extension moves the run to the Chrome side panel. This guide explains how the extension works and where it helps. It also shares best practices for manual testing with the extension.
What Is Manual Chrome Browser Testing?
Manual Chrome browser testing means a tester performs the steps of a test case by hand in a web application and compares the result with the expected result.
A test case holds the steps with their input data and the expected result. Preconditions describe the starting state. You follow the steps on the site and record whether the result matches. A failed step becomes a bug report with the evidence the team needs for a fix. The manual testing overview explains the process in detail.
The usual setup needs several windows:
- The test management tab holds the steps.
- The tab with the site holds the work.
- DevTools shows the console and the network calls.
- A separate tool takes the screenshot.
The run itself is a loop of switches. You read a step and switch to the app. You perform the action and return to the test tab to mark the result. A bug adds more switches:
- DevTools to inspect elements and find the error.
- The screenshot tool for the picture.
- The tracker for the report.
Every switch takes attention, and a long regression run multiplies the switches.
What Is a Browser Extension for Manual Testing?
A browser extension for manual testing is software that shows the test run inside the browser and collects evidence from the open tab. You mark results and attach proof in the same window.
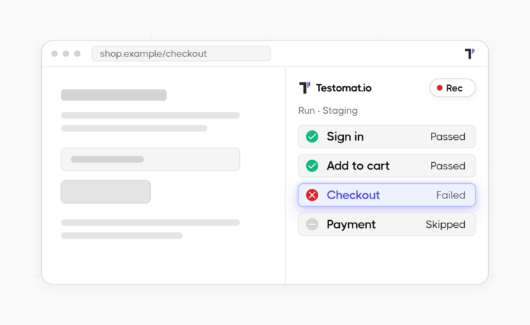
The Testomat.io extension opens the run in the Chrome side panel. The difference from the web app is the place where the work happens. Unlike test automation tools, the extension needs no browser driver and no code. The steps stay visible while you use the site. The screenshot and the console output come from the tab you test, and they attach to the result with a click. The same applies to the screen recording. The extension sends data only to the Testomat.io instance you connect it to, either app.testomat.io or a self-hosted instance over HTTPS. The extension needs the Chrome browser, version 123 or newer, and a Testomat.io account. It is open source under the MIT license, and the code lives in the GitHub repository.
Install the Testomat.io extension from the Chrome Web Store and open your first run in the side panel.
What You Can Do With the Browser Extension

The extension adds a Testomat.io panel to Chrome. The panel covers the manual testing work that usually needs several tools:
- Run manual tests. You follow the steps in the side panel and mark each test with a status and a comment.
- Capture screenshots. You take a shot of the tab or the full page. You can annotate it, crop it or blur sensitive data.
- Record your screen. You record the tab and review the take. You can trim it before you attach it to the result.
- Capture console and network data. You collect console errors and failed network requests from the tab.
- Create test cases. You add a test by title or write it in the Markdown editor with parameters.
- Record test steps. You perform a flow on the website, and the extension writes the steps for you.
How the Testomat.io Extension Works

The panel guides you along a simple path. You connect it to your project and open a run. You mark each test and attach proof when something fails. You can also save a new test from the actions you perform on the page. The web app receives every result while you work.
Step 1: Connect to the Project
You download the extension from the Chrome Web Store and click its icon in Chrome. Then you press Open Testomat.io & authorize. Testomat.io opens in a new tab and shows an access key. You paste the key into the panel and choose your project. The connection is ready, and the panel remembers it. A company that hosts Testomat.io on its servers adds the instance address in the Advanced settings first.
Step 2: Run the Test in the Side Panel
You open the Runs tab and select a run. The run appears as a checklist, and a click on a test shows its steps in the panel. You perform each step on the site and tick it in the panel. The test then gets a mark: Passed, Failed or Skipped. A short comment explains a failure to the rest of the team. The N key opens the next test that waits for a result. The arrow keys navigate between tests.
The panel can also open as a separate window, which helps on a second monitor.
Step 3: Collect Evidence on a Failed Result
A bug fix needs more than a note that the page broke. A quality bug report holds the technical details, and the extension collects them for you. You enable the Rec chip in the panel header before you repeat the problem. The extension then records what the page reports in the background: console messages and failed requests. You mark the test as Failed, and this record attaches to the result as a text file.
A screenshot shows a UI problem to the eye. You take a picture of the page, draw an arrow or a box around the broken part and add a short note. A blur tool hides personal data, and the hidden area disappears from the saved picture for good. A screen recording shows behavior that a static picture misses, for example a flicker or a slow loading state. You record the tab and cut the parts you do not need. The rest attaches to the result.
The result also carries a short note with the Chrome version and the operating system. It also names the window size and the page address. Whoever fixes the bug opens the failed test and sees the full picture.
Try it on your next failed test: add the extension to Chrome, enable Rec and mark the test as Failed.
Step 4: Create Test Cases From the Panel
New tests start in the panel too. You type a title to create an empty test. You can also open the editor and write the test case in plain text. A test that must run for several users or data sets gets parameters: you list the variants in a small table, and the run shows a separate row for each variant.
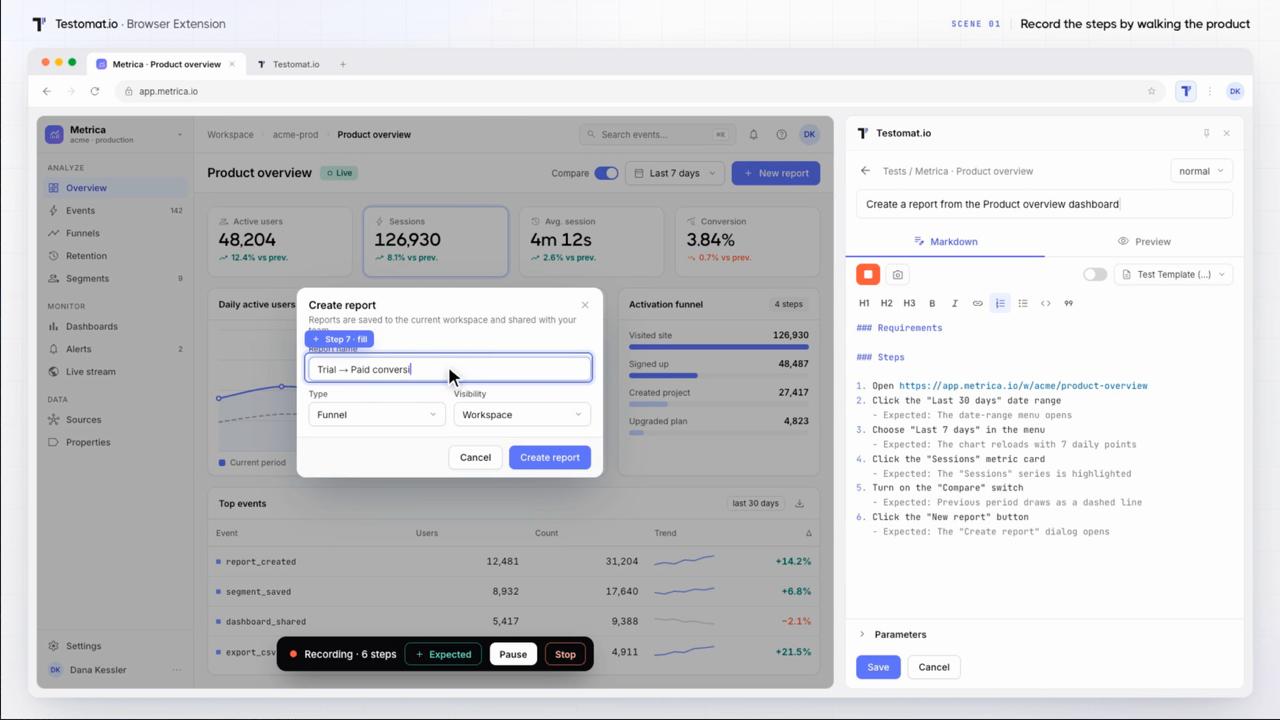
The step recorder saves you the typing. You press Record steps and perform the flow on the website as a user would. The extension writes each click and entry as a readable step, such as Click the Add to cart button. A page change becomes an expected result line. You press + Expected after a check and type what you saw, and this line attaches to the step.
The Polish with AI switch is off by default. With it on, Testomat.io AI rewrites the recorded steps into cleaner wording after you stop, and an undo returns the original. This is a simple case of manual testing with AI, where you keep control of the final text. This feature needs Testomat.io AI enabled for your company, and the AI features belong to the Professional plan and higher.
Step 5: Stay in Sync and Work Offline
The panel refreshes the open run regularly, so a colleague’s results appear while you work. A dropped connection keeps your results safe. A result that fails to save waits in the panel with a queued badge, and the panel sends it when the connection is stable again, as long as the panel stays open.
Benefits of Running Manual Tests From the Side Panel
- Fewer context switches. The steps and the site share a window, so your attention stays on the task instead of the tab bar.
- Complete bug reports. A failed result carries the console errors and the failed requests, plus the environment line. The context arrives with the first report instead of the second round of questions.
- Evidence for a faster fix. An annotated screenshot points at the problem, and a trimmed recording shows the sequence. Both come from the same tab.
- Test cases from real sessions. The step recorder converts an exploratory session into a documented test case with expected results.
- Safe handling of sensitive data. Masked fields and blur keep passwords and card numbers out of the project. Cut query strings keep tokens out too.
- Results survive a dropped connection. Queued statuses replay when the network returns, so a run on site or on a VPN keeps every mark.
The time saving comes from the removed switches and the removed second round of questions, and it grows with the length of the regression run.
Use Cases: Where the Browser Extension Helps

1. Regression Run on Staging Before a Release
Situation. A QA engineer runs the release checklist on the staging site under time pressure.
In the panel. The engineer opens the run next to staging. Each step gets a tick, and each test gets a status with a hotkey. A comment explains each failure.
In Testomat.io. The run progress updates live, and the release manager sees the state in the web app.
Result. The checklist finishes with fewer switches and with a comment on every failed test.
2. Bug Reproduction With Evidence in a Single Round
Situation. A QA engineer found a checkout bug and needs a report that leads to a fix.
In the panel. The engineer enables Rec and reproduces the bug. The Failed mark attaches the record.
In Testomat.io. The result holds the console and network record with the failed request and the response snippet.
Result. The fix starts from the attached record, and nobody asks for reproduction steps.
3. Exploratory Session That Becomes a Test Case
Situation. A QA specialist explores a new feature on the dev environment and finds a flow worth keeping in the regression suite.
In the panel. They start a new test and press Record steps. The flow on the page becomes the steps. Expected results go in with + Expected.
In Testomat.io. A Markdown test case with steps and expected results appears in the suite.
Result. The exploratory session leaves documentation instead of notes.
4. User Acceptance Testing by Business Users
Situation. A product owner reviews a release candidate and has little time to learn a test management tool.
In the panel. The product owner opens the run link in the side panel and marks each scenario with a status and a comment.
In Testomat.io. The QA lead sees the acceptance results in the same run as the QA team’s marks.
Result. User acceptance testing happens in the product owner’s Chrome window with the same evidence rules.
5. Payment and Identity Flows on a Production-Like Site
Situation. A QA engineer runs checkout and sign-in scenarios with realistic card and identity data.
In the panel. The engineer enables the setting that excludes typed values from recorded steps and blurs card data on each picture before saving.
In Testomat.io. The recorded steps name the fields, and the pictures show the layout with the sensitive areas destroyed.
Result. The project holds the evidence and stays free of card numbers and personal data.
6. Distributed Team on a Shared Run
Situation. Two testers in different time zones share a regression run.
In the panel. Both open the run, and the panel refreshes the colleague’s marks while they work.
In Testomat.io. Assignments show who owns which test, and comments explain each failure for the next shift.
Result. The team avoids double work and hands the run to the next shift with context.
7. Testing on a Weak Network or On Site
Situation. A QA engineer runs a kiosk regression in a store, with a VPN that drops every few minutes.
In the panel. The engineer marks results as usual. A status that fails to save receives a queued badge.
In Testomat.io. The queued statuses arrive when the connection returns, in their original order.
Result. The on-site run keeps every mark, and zero tests need a second pass.
8. Bug Reports Developers Can Reproduce
Situation. Many bug reports get the label unreproducible because they lack context. This breaks the defect management process at the first step.
In the panel. The QA engineer attaches the record, the annotated screenshot and, for motion problems, the trimmed recording.
In Testomat.io. The failed result becomes a defect created from the report, with the evidence attached.
Result. The number of unreproducible replies drops, and the fix starts from the first report.
Found your scenario in the list? Install the extension and run it in the side panel today.
Why Choose the Testomat.io Extension?
- Side panel next to the site. The run opens in Chrome’s side panel or in a detached window. Hotkeys cover statuses and navigation.
- Annotated images with permanent blur. Arrows, boxes, numbered markers or crop, plus a blur that removes the pixels from the saved file.
- Screen recording with trim. You review the take on the page and upload only the kept parts.
- Console and network data on failures. The record attaches to a failed result by itself. It holds the failed request and the response snippet.
- Step recorder with masked fields. Clicks and entries become Markdown steps, and sensitive values stay out.
- Parameters. A test runs for each data row, and each row gets a separate mark in the run.
- Offline queue. Statuses wait in the panel and replay when the connection returns.
- Privacy by design. The extension works with zero intermediate servers and includes zero analytics or telemetry.
- Open source and self-hosted ready. MIT license and public code, with support for self-hosted instances over HTTPS.
- The Testomat.io web app around it. Test cases in the Markdown editor, test runs with assignees and environments, issue tracker integration with Jira, Linear, GitHub, GitLab or Azure DevOps, and run reports and analytics that show manual and automated results together. Analytics belongs to the Professional plan and higher.
- Explorbot, the AI exploratory agent from Testomat.ai, explores a website autonomously. The extension supports the human run and the human judgment in it.
Best Practices for Manual Testing With the Extension
- Enable Rec before you reproduce a bug. The auto-start setting in Settings → Failure log arms Rec each time you open a test in a run.
- Blur before you save. The blur is permanent. Review the screenshot before Save. Attach the original only when the picture holds zero sensitive data.
- Exclude typed values on payment sites. The Step recorder setting replaces every entered value with a neutral phrase.
- Add expected results while you record. Press + Expected after each step you verify, so the test case carries the verification and the action.
- Use parameters for role-based checks. A login test with role and email columns covers each user type as a separate row.
- Keep the panel open on a weak network. The queue replays only while the panel stays open.
- Learn the hotkeys. Cmd or Ctrl with Enter, U or I sets the status. N opens the next untested test.
- Detach the panel on a second monitor. The site fills the main screen, and the run stays visible on the other.
Bottom Line
Manual testing takes less time when the run and the evidence stay in the same Chrome window. The Testomat.io extension shows the steps in the side panel and attaches the evidence to a failed result with a click. Every result appears in your Testomat.io project, ready for the report or the defect. Install the Testomat.io extension and connect your project. If you are new to Testomat.io, you can create a free account first, then open your first manual run in the side panel.